


-
There has been a recent cluster of spammers accessing BARFer accounts and posting spam. To safeguard your account, please consider changing your password. It would be even better to take the additional step of enabling 2 Factor Authentication (2FA) on your BARF account. Read more here.
You are using an out of date browser. It may not display this or other websites correctly.
You should upgrade or use an alternative browser.
You should upgrade or use an alternative browser.
60's Honda CL 160 Rebuild as Racer
- Thread starter twitchmonitor
- Start date

McGrude
vroom
- Joined
- Jun 25, 2008
- Location
- Sunnyvale, CA
- Moto(s)
- 2021 Husqvarna 701 Supermoto, 2017 KTM RC390
- Name
- Mike

 arty
artyLooking good. Please tell us you have a digital video camera that you can use when you first fire it up so we can share vicariously in the event.
twitchmonitor
New member
Not until I fix the flat front tire, sort out the intakes, mount the tail, plumb the bike, make new spacers for the front axle (since I had to replace my forks with 175 forks), etc... 

akathisia
Gait Plagiarist
- Joined
- Jan 19, 2004
- Location
- Mainly in the garage
- Moto(s)
- '74 CB550, '77 RD400, '79 Vespa P200E, '01 996, '03 R4.5, '03 RT1150
- Name
- PJ
David,
Thank you very much for giving me your extra seat! Got it mounted up along with some other do-dads. I included a pic to show how awesome that seat looks on the bike.
You being an engineer and all.... maybe we can discuss the reasons for and against cutting off the ends of the frame under the seat behind the shocks. It would look a lot better getting rid of those ugly protuberances.... but I don't want to weaken the frame in the wrong places and cause some kind of frame failure or something.
Your bike is looking awesome!!! I look forward to racing you on the track.
Thank you very much for giving me your extra seat! Got it mounted up along with some other do-dads. I included a pic to show how awesome that seat looks on the bike.
You being an engineer and all.... maybe we can discuss the reasons for and against cutting off the ends of the frame under the seat behind the shocks. It would look a lot better getting rid of those ugly protuberances.... but I don't want to weaken the frame in the wrong places and cause some kind of frame failure or something.
Your bike is looking awesome!!! I look forward to racing you on the track.
Attachments

twitchmonitor
New member
Glad to help!
Cutting those tube ends off makes, essentially, no structural difference. Welding a crossmember between them, however, could aid in chassis stiffness.
Cutting those tube ends off makes, essentially, no structural difference. Welding a crossmember between them, however, could aid in chassis stiffness.
akathisia
Gait Plagiarist
- Joined
- Jan 19, 2004
- Location
- Mainly in the garage
- Moto(s)
- '74 CB550, '77 RD400, '79 Vespa P200E, '01 996, '03 R4.5, '03 RT1150
- Name
- PJ
Anymore work on your bike? Any updates?!
twitchmonitor
New member
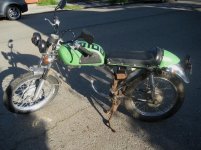
Here's what I have so far for the 175. Just doing a mock up while I work on the engine (those mirrors, for example - just pretend they don't look like that Just what I had lying around). This guy will be street legal, and I'll also bring it to Bonneville.
Just what I had lying around). This guy will be street legal, and I'll also bring it to Bonneville.Attachments


I just read the entire thread in one sitting, amazing. You have done more with basic tools [and a machine shop ] in your laundry room than some people are capable of with dedicated facilities.
You have caused me great distress, however.
Nearing the last pages of this thread, watching the post count grow and the dates rapidly grow closer to the current one, I was filled with a growing sense of dread that the project's completion would *gasp* not yet be documented.
Why must you torture us so! Get on with it then !!
!!
] in your laundry room than some people are capable of with dedicated facilities.You have caused me great distress, however.
Nearing the last pages of this thread, watching the post count grow and the dates rapidly grow closer to the current one, I was filled with a growing sense of dread that the project's completion would *gasp* not yet be documented.
Why must you torture us so! Get on with it then
!!
twitchmonitor
New member
I know! I just got word that my spark plug boot are (finally!) in the mail (the seller is hardly on the ball). Then I'm making molds of the fender and belly pan (which needs some Bondo love), then clearcoat, torque bolts, fill with fluids and go.
I'm just hell of busy with school and other projects (for example, see my article in April's CityBike)
I'm just hell of busy with school and other projects (for example, see my article in April's CityBike
)
firstbuell
GO! 04,16,23,31,64,69,95
- Joined
- Mar 2, 2004
- Location
- dem hills o'Redwood City
- Moto(s)
- 99 Buell M2 Cyclone;06 KTM 450 EXC-plated!;04 Specialized Stumpjumper Comp Disc;19 Wilier Cento1Hy
- Name
- Curt
Bonneville ? - nobody's said anything about the Salt Flats yet !
David, looks like you've already been fully bamboozled by Bob & Jim -
there'll be NO hope for you, once you're 'Salt-blinded' that very 1st time.......
David, looks like you've already been fully bamboozled by Bob & Jim -
there'll be NO hope for you, once you're 'Salt-blinded' that very 1st time.......
Attachments


trepanned23
New member
- Joined
- Oct 7, 2007
- Location
- Los Angeles
- Moto(s)
- 85 Honda VF700F Interceptor, 85 Honda VF700C Magna, 67 Bultaco 250 M26 RR, 68 Yamaha YCS1 RR
- Name
- George Aus
Looking good, David. You might try making those stack screens from bronze. You'll need to fab up a clamping ring that secures itself around the outboard edge of the bell. You can braze a flat hunk of bronze 90 mesh into the inside of this clamping ring. The way I see it - you absolutely cannot permanently secure a screen to your carb - that would be high dumbness
See you on the grid at Willow? Portland?
George Austin
AHRMA #560
Yamaha 180 Wildcat
See you on the grid at Willow? Portland?
George Austin
AHRMA #560
Yamaha 180 Wildcat
trepanned23
New member
- Joined
- Oct 7, 2007
- Location
- Los Angeles
- Moto(s)
- 85 Honda VF700F Interceptor, 85 Honda VF700C Magna, 67 Bultaco 250 M26 RR, 68 Yamaha YCS1 RR
- Name
- George Aus
Looking good, David. You might try making those stack screens from bronze. You'll need to fab up a clamping ring that secures itself around the outboard edge of the bell. You can braze a flat hunk of bronze 90 mesh into the inside of this clamping ring. The way I see it - you absolutely cannot permanently secure a screen to your carb - that would be high dumbness
See you on the grid at Willow? Portland?
George Austin
AHRMA #560
Yamaha 180 Wildcat
See you on the grid at Willow? Portland?
George Austin
AHRMA #560
Yamaha 180 Wildcat
Cereal KLR
New member


twitchmonitor
New member
Bob has brazing equip but honestly I prefer to not impose on other people - so I'm trying to do it another way. I've attached the screens with a highly elastic tape - its the OEM tape honda used for their wiring harnesses in the 70s. It deforms easily, and I was able to "mold" it around the lip of the intake stack. It essentially now has now taken on a "V" cross sectional shape. It feels very secure. If it becomes worrisome in the future, I may try to use small screws through the flat rim of the screen into the stack...I made the wall thickness of the stack thick enough for a very small screw - I think the walls are 4 mm thick.
I'm pretty sure I have a pic posted with this setup. I know that I certainly wouldn't advocate tape as a fastener, but in this application it seems ok. I may also just drill tiny holes through the screen ring and stack lip and run safety wire between them for....safety.
Unless you meant you don't think the stack themselves will stay on the carbs? That's another story.
As far as races....money is extremely low right now. Like, under $100 low :| Time to put some stuff on Ebay. I should be getting an engineering job in May when I graduate, but until then I just don't know. Where's the emoticon for depressed?
Edit: I just check and that pic doesn't show the screen attached, just stuck on. I'll try to post one tonight.
I'm pretty sure I have a pic posted with this setup. I know that I certainly wouldn't advocate tape as a fastener, but in this application it seems ok. I may also just drill tiny holes through the screen ring and stack lip and run safety wire between them for....safety.
Unless you meant you don't think the stack themselves will stay on the carbs? That's another story.
As far as races....money is extremely low right now. Like, under $100 low :| Time to put some stuff on Ebay. I should be getting an engineering job in May when I graduate, but until then I just don't know.
Where's the emoticon for depressed? Edit: I just check and that pic doesn't show the screen attached, just stuck on. I'll try to post one tonight.
Looking good, David. You might try making those stack screens from bronze. You'll need to fab up a clamping ring that secures itself around the outboard edge of the bell. You can braze a flat hunk of bronze 90 mesh into the inside of this clamping ring. The way I see it - you absolutely cannot permanently secure a screen to your carb - that would be high dumbness
See you on the grid at Willow? Portland?
George Austin
AHRMA #560
Yamaha 180 Wildcat
Last edited:
twitchmonitor
New member
I know. :|
I clear coated the tank and seat yesterday with a two part epoxy and torqued all the nuts and bolts today. Just to be safe I'm going to wait a week to get the gas can out. I filled the oil, put the battery on the battery tender, and then I hooked up the electrical system and got a wire crossed, which got my coil very hot and one of the posts broke from the heat. Not sure what I'll do about it....I'm trying to think of something free and clever.
I did, however, get my EX500 ready for a few days or riding Streets of Willow and finished building a prototype robot leg.
I clear coated the tank and seat yesterday with a two part epoxy and torqued all the nuts and bolts today. Just to be safe I'm going to wait a week to get the gas can out. I filled the oil, put the battery on the battery tender, and then I hooked up the electrical system and got a wire crossed, which got my coil very hot and one of the posts broke from the heat.
Not sure what I'll do about it....I'm trying to think of something free and clever.I did, however, get my EX500 ready for a few days or riding Streets of Willow and finished building a prototype robot leg.

RhythmRider
Still Rhythm Rydin'
- Joined
- Nov 18, 2006
- Location
- Livermore, CA
- Moto(s)
- BMW S1000R,
Suzuki SV650N,
Yamaha YZF-R3
- Name
- Aaron
- BARF perks
- AMA #: 2821744
Pics of the leg please! lol I think we deserve something for being so patient
twitchmonitor
New member
Pics of the leg please! lol I think we deserve something for being so patient
One of the software guys has it today, he's going to send me a short vid this afternoon - I'll post it when I get it.
twitchmonitor
New member
Ok, here's a vid of the prototype robotic leg I just finished. Now I'll have to make some minor tweaks to the design and then crank out half a dozen of them as well as the body and a few other bits. All in the next 3 weeks.
Vid is shot and narrated by my friend Tyler, who is the mastermind behind the whole thing.
http://www.youtube.com/watch?v=5ReoMRYK_zg
Vid is shot and narrated by my friend Tyler, who is the mastermind behind the whole thing.
http://www.youtube.com/watch?v=5ReoMRYK_zg