• There has been a recent cluster of spammers accessing BARFer accounts and posting spam. To safeguard your account, please consider changing your password. It would be even better to take the additional step of enabling 2 Factor Authentication (2FA) on your BARF account. Read more here.

How to replace your chain - Ninja 500R / EX-500 - step by step

SoarAndEnvision

Zyklon Aeon
Joined
Aug 15, 2006
Location
San Francisco
Moto(s)
2002 Kawasaki Ninja 500R, 1998 Yamaha YZF 600R
Name
Namdar
hey guys,

I was in desperate need of changing this so I figured I'd document it for the ex-500.com guys and you all, and maybe see if I could make it funny along the way :)

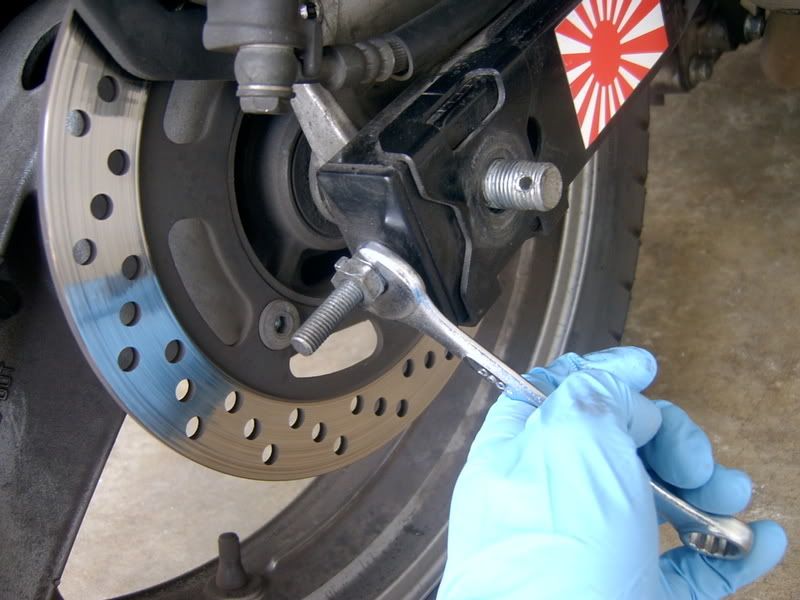
First thing's first, check out your chain.

Chains usually last at least 15,000 but depend how you ride and where, and how you take care of it.

I am a bad example :
1) Irregular lubrication
2) A fair amount of hard and frequent riding
3) stupid shit like wheelies that puts a lot of pressure on your sprocket (and contributed to one of my teeth being broken so I was told .... )

So let's take a look at the suspect :

2002 Ninja 500 w/ muzzy exhaust and rejetted carbs set to maximize low end power :

SV400050.jpg


Rusty, constantly getting loose with some O rings missing....

SV400056-1.jpg


yeah we're gonna classify that as "why are you so ugly" - so let's get started.

---

I ordered my kit from Florida - "Accessories International"

I recommend getting a kit with all the sprockets, they all work in concert and you will significantly diminish the life of your chain by ordering a chain only.

SV400049-2.jpg


It took 10 days to get here :( - but it was a great deal - about 120. hard to beat.
Also I noticed it was a 16/42 configuration. I was running a 16/41 setup and really happy with my off the line power and those first gear wheelies - Jimmy said this will increase it even more and sacrifice some top speed - sounds great to me! let's see where it goes.... :teeth
 
Now that we are gonna get working, I recommend throwing some Fear Factory on for background music - especially Slave Labor of Archetype :)

You're gonna need to get the wheel off so remove the cotter pin and axle nut:

SV400053.jpg


Loosen chain tensioners on either side to relieve some of the pressure off the chain:

SV400054-2.jpg


Last thing to crank before we hike her up, the rear brake bracket - go easy on these Alan-nuts, they strip easy :

SV400057-1.jpg
 
Now I dont' have a swing arm stand and I ditched my center stand for my pipe, so I use a floor jack under the spring with a small piece of wood.
Hey it's not race-track worthy, but it works, and I'm from Fresno, so shut up :)

SV400055-2.jpg


Now support the wheel your right hand and/or right foot and slide out the axle with your left hand:

SV400058-1.jpg


Always a good idea to tie up your brake caliper when you take it off the rotor so you don't strain the brake hoose.
SV400060.jpg


Alright, now we got the wheel off, lets change that nasty looking rear sprocket!

SV400059-1.jpg
 
With a small twist of the sprocket by hand it comes right out the wheel :

SV400061-1.jpg


Now to get the nuts off - it's actually a good idea to keep it on the wheel when you loosen it, because they are on REALLY tight.

Now I lost my 14 mm socket, so I had to go buy another one. And why buy a 5 dollar socket when you can buy a lower grade set for 10 bucks :)

K Naumy, don't lose this one!

SV400064-1.jpg


And while I was out I had to pick up some items I knew I would need later

SV400063-1.jpg


Sam : "You know you are the only guy that buys 40's and the Journal at the same time ?"
Me : "What can I say Sammy boy ...."

OK back to business:

Now that you loosen the nuts off the sprocket its a good idea to clean the filthy base:

SV400067.jpg


Then attach your new friend :

SV400070-1.jpg
 
Let's take care of the front sprocket now.
Remove the cover (these bolts are really sensitive to breaking too be careful)

SV400071-1.jpg


Those are colors I do not like seeing on my bike :

SV400073-1.jpg


Nasty....

Remove the 2 8mm bolts that hold the sprocket on. (Most bikes have one larger one in the center, but this model doesn't.

SV400074-2.jpg


Then clean out as much of the filth as you can and put your other new friend on :)

SV400079-3.jpg


Make sure it's on real tight when you put it on too.
I told Jimmy on the phone it wasn't on that tight before and whether that means it shouldn't be on that tight now.
His response was "No that just means dude that's been riding it has been riding the hell outta it." :teeth
 
Now you need to wait till your friend gets to your place with his chain breaking /linking tool as you really can't proceed without it.

So while you wait I suggest Mortadella and Battlestar Galactica :

SV400076-1.jpg


"Boy Jimmy's taking forever..."

SV400077-1.jpg


JIMMY'S HERE!

SV400078-1.jpg


Let's get back in the garage.
 
The way this guy works is that there is a chamber that goes over the rivet and holds the whole link tight while a smaller piece is cranked into it and pushes the rivets out. You take care of two, and boom you de-link your chain:

SV400001-1.jpg


Now that you got that somabitch off, you feed your new chain through the front sprocket and bring it under the swing arm piece

SV400003-2.jpg


Now to link this chain, its the inverse of the de-linking, put chamber around rivet that you want to compress into master link :

SV400004b.jpg


SV400005-1.jpg


Now there's a clip that you need to attach. You're really not supposed to do this with locking pliers, but I did and it worked fine.
Make sure the open end is away from the directional spin of the chain. I didn't take a photo of mine cause I forgot, but here is one I found :

SiliconMasterLink.jpg
 
Now that the chain is in one piece, get it on the front sprocket and get your tensioners loose so you can get it on the rear sprocket.

SV400008-2.jpg


Now it's time to get the chain tension right - you want it to have about an inch of play total, so .5inch on each side.
You also want to make sure you align the back wheel properly - if you don't your handling is going to suck ass and your tire is going to get jacked.

The easiest way I was taught to do this, is find those triangle imprints on your tire and measure them to a fixed point on the swing arm and make sure they are uniform on each side:

SV400009.jpg


Now put everything back and tighten all :
- crank cover
- axle nut
- brake bracket
- etc.

when you take care of everything, lower the bike and retighten the rear sprockets - they have to be REALLY tight

SV400010-2.jpg


so move around the bike in neutral so you can access all six and tighten the bejesus out of em.

Now it's time for a spin....
 
Ok wow.

Sure enough, off the line, its got more kick than even before, 1st gear wheelies are easier than ever and stay up longer. Feels GREAT. Feels like when I put the pipe on.
So I'd recommend 16/42 on this bike for sure :)

SV400011-2.jpg


Check her one more time to make sure nothing bad happened to the chain and remember to lube it after the first 100 miles.

SV400012b.jpg


Good luck and ride safe!
 
er,you put the wheel on backwards.....
 
Good writeup, Naumy.

Watch that clip, though, they've been known to get tired and leave. I think glf lost a good 1,500 of them off his monster in the course of a week.

The rivet-style master links are a heck of a lot more reliable.
 
DOOD!!

You forgot to add a little henweigh when you put the cush drive back together..
trouble!!
 
Ironbutt said:
DOOD!!

You forgot to add a little henweigh when you put the cush drive back together..
trouble!!

Hey, just cause I actually thought about Jimmy's post for like 2 seconds don't mean I'm not hip to the hen-weigh....

TOLD You I was from Fresno :p
 
SoarAndEnvision said:
Hey, just cause I actually thought about Jimmy's post for like 2 seconds don't mean I'm not hip to the hen-weigh....

TOLD You I was from Fresno :p

:teeth

It's always better in person.. and it's always better when I get it past an old salty parts person..
 
Back
Top