
• There has been a recent cluster of spammers accessing BARFer accounts and posting spam. To safeguard your account, please consider changing your password. It would be even better to take the additional step of enabling 2 Factor Authentication (2FA) on your BARF account. Read more here.

Composite Party 1/27: The Sequel

I had a great time! Going to try and meet up with chris today and get my part! hope to have some pics of them trimmed and on the bike soon.
 
Video links added to the first post. Check it out! Thanks to Vic for the work to make that happen.
 
Silly question about vacuum bagging: Has anyone tried to pull vacuum with a mitivac brake bleeder??

I have been doing brake stuff on my SV1K this weekend, and broke out my new bleeder and thought it would be useful in place of having an actual vacuum pump.
 
Just watched the vids.....can't wait for the parts 3,4, etc. :teeth
 
DougZ said:
Silly question about vacuum bagging: Has anyone tried to pull vacuum with a mitivac brake bleeder??

Haven't tried, but being the cheap ass that I am, my brother and I have been trying to figure out ways to jerry-rig some sort of pump to create the vaccum without shelling out 2-300$ for the pump. If and when we test this and is successfull, I'll be sure to share the results!

In the meantime, here are the parts my brother made at Chris'. I'll let Chris elaborate on the unorthodox molding technique that we used :blush Here are the two parts sanded down with 600 grit to even out the excess epoxy that was on top:

Images00021.jpg
 
Last edited:
And here are the parts, after I put 3 coats of clear on them, to give them their beautiful CF shine back :cool

*BLING*

I'll post pics of them mounted on the bike when I put it back together this weekend!

2960574-images00022.jpg
 
Last edited:
zeefrenchspy said:
Haven't tried, but being the cheap ass that I am, my brother and I have been trying to figure out ways to jerry-rig some sort of pump to create the vaccum without shelling out 2-300$ for the pump. If and when we test this and is successfull, I'll be sure to share the results!

In the meantime, here are the parts my brother made at Chris'. I'll let Chris elaborate on the unorthodox molding technique that we used :blush Here are the two parts sanded down with 600 grit to even out the excess epoxy that was on top:

Images00021.jpg

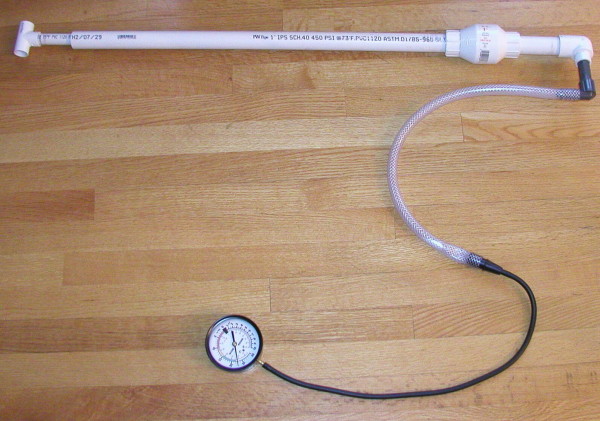
Trust me, before I thought about using the mitivac, I had serious thoughts about making this homemade one:

http://sci-toys.com/scitoys/scitoys/aero/vacuum/

small_with_gauge.jpg


LOL

I think they only alternative will be to send Chris my molds and fabric, and let him make and vacuum the parts for me. Sounds good, right Chris. :applause

BTW..the cleared parts look really good. I'll have to send my part to you for clearing too. LOL
 
ooohhh, thanks for the link!!! Looks like I've got a project for the coming weeks! They said it pulled 10-12 psi, which isn't too bad. I remember Chris saying he was running the pump at around 20. Better than nothing I guess...

Unfortunately, it won't be ready for the undertail I am making this week. Well, it could be, but I don't have all the other vaccum bagging supplies yet....
 
Last edited:
Another "Video by Vic" has been added. Link #3 in the first post.
This one is the overview of the vacuum bagging we did.

Big "THANKS again!" to Vic for the effort he's put into all this.
 
tygaboy said:
Making their own vacuum pumps...
Geez, next thing you know, these guys will be trying to weave their own carbon fiber... :nerd :laughing ;)

Hey, awesome idea! There's a place called "hangtown fibers" on the interweb that sells looms. http://www.hangtown-fiber.com/floor.php

Looks like you could even build your own. Is there a place to get carbon thread?

:p

2962608-loom_dbb.jpg
 
zeefrenchspy said:
ooohhh, ...

Unfortunately, it won't be ready for the undertail I am making this week. Well, it could be, but I don't have all the other vaccum bagging supplies yet....

Can you send/share some pics of the undertail? I think there's enough footage for a short (2-3 minute) video of your tail section. Also, I want to see how it turns out.


PS, if the other video producers there that day want my raw footage, just PM me with mailing info.
 
I started a thread with pictures over here:
linky

PM me if you want the full res versions or pictures of some of the steps in between as I only posted the main ones.

The part should be out of the mould tonight, so I should be posting more pics tomorrow.
 
Good third vid. As always, fun to watch.

I have personally been looking for a cheap vacuum pump online.but not finding anything cheap enough, especially when adding up the cost of the materials I will still need...all the bagging supplies as well as the resin and hardner. As other have said, it may be cheaper to go just buy the $200 fender and be done with it.
 
Folks, you can get a nice little pump like the one I have for about $100 on ebay. Mine is a GAST. You want something that pulls at least 20 inches - mine gets to about 23 by my gauge.
Yes, there are other supplies to buy but if you're going to go to the time and trouble of making a PVC hand vacuum pump, better to do an internet seach on 'make vacuum pump' and find the overview of how to use an old refrigerator motor to make one.
But again, just like the very carbon parts we're making:
If you can buy it, it's likely cheaper than making it yourself.
Just my $.02...

And what would a discussion of vacuum pumps be if we didn't offer up at least one:

You suck

:applause
 
Dang, That's Awesome!! I wish you were a little closer, I would love to go and learn how to do carbon fiber!

I have a question, I had some small fenders made for a pocketbike, and the guy told me he had to buff it out to make it shiny?? (one fender has more of a gloss) is it simply buffed??or is it sprayed with clear?? Thanks for any Info.....Great Videos!! at least it gives me an idea on how it's done


tygaboy said:
What a day! Lots of attendees, lots of heel guards, lots of fun. We're doing what we can to organize all the pics and videos and we'll get things posted ASAP.

EDITED 2/2/07: The first of the video is available! Big thanks to Vic for making this happen.

Part 1 (using back of part as mold)
http://www.youtube.com/watch?v=q_fKlDzemPY

Part 2 (laying carbon fiber)
http://www.youtube.com/watch?v=IWiSSLPf6JI

Part 3 (vacuum bagging)
http://www.youtube.com/watch?v=s12pUg9ypVU
 
Last edited:
Re: Re: Composite Party 1/27: The Sequel

woof said:
Dang, That's Awesome!! I wish you were a little closer, I would love to go and learn how to do carbon fiber!

I have a question, I had some small fenders made for a pocketbike, and the guy told me he had to buff it out to make it shiny?? (one fender has more of a gloss) is it simply buffed??or is it sprayed with clear?? Thanks for any Info.....Great Videos!! at least it gives me an idea on how it's done

Come on - Stockton isn't that far away!
Re: your fenders, it's hard to say without seeing them. It's possible that the outermost layer of epoxy can be polished and it may be that it was clear coated. But if the mold is shiny, the part made in that mold will be shiny - no polishing required. Clear coat is a good idea to prevent UV damage/yellowing and it allows for the part to be sanded to remove any imperfections that may exist in the finished part.
 
And here's the final part, mounted on the bike (with newly painted trackday fairings as well :teeth)

Black CF and the yellow fairings go very well together, I think I'm gonna have to make some more CF bling parts!

2984683-cf_cover.jpg
 
zeefrenchspy said:
And here's the final part, mounted on the bike (with newly painted trackday fairings as well :teeth)

Cool-a-mundo! Looks nice. Not bad for a few $ and an afternoon's work.

BTW, what, exactly, did you use for the clear coat? Rattle can, which brand, technique? Just curious as I've never clearcoated my stuff but would like to see what it looks like...
 
I used some U-POL #1 clear coat since it's what I had on hand. It's rattle can and I sprayed about 3 coats on them. The finish is better than what we started with (open-air layup), but I don't think it would be better than a vacuum bagged piece. will have to test out if it's worth doing on vacuum'ed pieces that already had a nice surface.
 
well i finally did it, i got my supplies on Monday and go to work. Here are the pics of the things i've done so far. As you can see it looks like i had some pockets of air.

Chris, do i need to start again or can these pieces be saved somehow (clear coat). Also do i need to sand them before i put the clear coat. let me know, Thank you

3012826-cfa.jpg
 
Back
Top