2 mounts, 2 rubber grommets. Its not the best setup. Id like to see a pair of the SP2 radiators, see what they changed on em. I might jb weld a little aluminum plate from the mounting bracket along the bottom core to the tank to take some of the stress off that one point in the core.
-
There has been a recent cluster of spammers accessing BARFer accounts and posting spam. To safeguard your account, please consider changing your password. It would be even better to take the additional step of enabling 2 Factor Authentication (2FA) on your BARF account. Read more here.
You are using an out of date browser. It may not display this or other websites correctly.
You should upgrade or use an alternative browser.
You should upgrade or use an alternative browser.
RC51 rebuild
- Thread starter kgmoto
- Start date
rothmans
Lowering my expectations
My motor isn't in terrible condition. Why procrastinate the rebuild by buying another used motor that's going to need the same shit a few thousand miles down the road... The goal is build a motor that runs like it was delivered from the factory.
These engines are good for AT LEAST 100K in stock form, a solid used engine should perform like new for a long time.
rothmans
Lowering my expectations
2 mounts, 2 rubber grommets. Its not the best setup. Id like to see a pair of the SP2 radiators, see what they changed on em. .
For one thing the SP2 left radiator does not have the bung for the temp sensor...you can use SP1 on SP2 and vice versa, usually minus one mount, but it works and is do-able.
Looks like you are digging into it, good luck with the project!
Last edited:
For one thing the SP2 left radiator does not have the bung for the temp sensor...you can use SP1 on SP2 and vice versa, usually minus one mount, but it works and is do-able.
Looks like you are digging into it, good luck with the project!
The left radiators temp sensor is only for the fan, correct?


rothmans: youre right these engines are bulletproof.... I think I may be reusing all my head components. Gaskets, rings and a good valve cleaning and lash adjustment is probably all I REALLY need (plus a clutch).
Heres a pic of an exhaust valve... look burnt?
Heres a pic of an exhaust valve... look burnt?
Attachments

Last edited:
Considering a motor swap, as the cost to rebuild is at minimum going to be ~$600. Thats new rings, bearings, and gaskets all around, a lot of new bolts, and new clutch plates. No new valve components.
If I swap, I go home with a fairly good motor in a box to rebuild later. Win win?
If I swap, I go home with a fairly good motor in a box to rebuild later. Win win?
Last edited:
Mille Racer 69
Axe Wielding Maniac
yep, just get another motor.
Old bump.
I ended up going the route rebuild this motor.
Shipping for the first list of parts was slow, and I have a second list still slowly growing that I'll submit when the motor is actually going back together. My first list didn't include pistons or valve train, but I think I really should fully replace both... opinions? (30k on current valves & pistons)
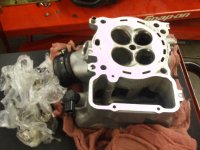
I've left the motor in its casing until now, today I split the casing, removed and disassembled the pistons.. Now I need to get a solvent tank set up here and get these parts sparkling again before I put any of my new parts in.
Heres how the motor sits now, and a piston showing the scoring on the front and rear skirts. Unfortunately they're webcam pics... Ill have better once I find where I packed my camera...
I ended up going the route rebuild this motor.
Shipping for the first list of parts was slow, and I have a second list still slowly growing that I'll submit when the motor is actually going back together. My first list didn't include pistons or valve train, but I think I really should fully replace both... opinions? (30k on current valves & pistons)
I've left the motor in its casing until now, today I split the casing, removed and disassembled the pistons.. Now I need to get a solvent tank set up here and get these parts sparkling again before I put any of my new parts in.
Heres how the motor sits now, and a piston showing the scoring on the front and rear skirts. Unfortunately they're webcam pics... Ill have better once I find where I packed my camera...
Attachments


Last edited:
You won't be unhappy with a rebuild motor. Know that there is always a reason for parting out a bike and it isn't always a crash. I know of many cases where people install used motors in bikes only to have it fail a short time later. It's a lot of work installing a used motor. But, what you show as scoring on your pistons is normal wear. But, the cost of pistons and a fresh cylinder is about equal to just the gaskets to do all this work so you might as well do it. I think even companies like US Chrome list the cost of a replate on their website for an RC51. It's around $400 if I remember.
Going to drag this thread out a few more posts....
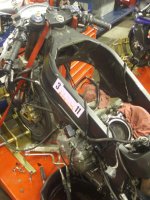
After months of slowly acquiring the parts and tools necessary to rebuild my motor, I've finally gotten everything (I think) that I need to finish the job. I've set myself a deadline of this saturday to have the motor in the frame and running. I'm going to have a few friends over for drinks and to hear my unmuffled RC51 take its first breaths after the rebuild.
Here's my motor as it sits.
Attachments

Last edited:
Sometimes... well... a lot of times, Im not too smart... Or a plan ahead-er. Lapping my valve seats took away material. That translates to .150mm of difference in valve lash. Yeah, I didnt think it'd be that big of a difference, but .150 is not a big difference, until you look at how much of the shim is sitting above the valve spring retainer. So I'm way out of the range of adjustment with shims, and have to remove my heads, remove the valves, and remove .150 from the stems. Whats the best way to do this? So far my plan is to go back to my high school metal shop, talk to my instructor about it, and see if putting the valves on the mill is the best way. I cant think of any way to take off a measurable amount of material with the valves still in the head and the head on the motor.
afm199
Well-known member
Sometimes... well... a lot of times, Im not too smart... Or a plan ahead-er. Lapping my valve seats took away material. That translates to .150mm of difference in valve lash. Yeah, I didnt think it'd be that big of a difference, but .150 is not a big difference, until you look at how much of the shim is sitting above the valve spring retainer. So I'm way out of the range of adjustment with shims, and have to remove my heads, remove the valves, and remove .150 from the stems. Whats the best way to do this? So far my plan is to go back to my high school metal shop, talk to my instructor about it, and see if putting the valves on the mill is the best way. I cant think of any way to take off a measurable amount of material with the valves still in the head and the head on the motor.
What's your metric for too much? Hold off on grinding those tips, they are probably heat treated. It's not unusual for part of a shim to clear the retainer. Why are you "out of the range of adjustment? .15mm is nothing, 6 thou of an inch. If that's all it is sticking above it is NOTHING. Typical valve jobs go 6-15 thou or more. Did you lap the seats with a sacrificial valve or the original valve? By the way, I hope you went with new valves at 30k.
Also hope you ended the lapping with a very fine compound, I use metal polish.
When I went to high lift cams with a reduced base circle on my SV I had 260 shims where there had been 160. You can believe there was shim sticking out. Also check those springs to see if they still are in spec.
Last edited:
The valve is treated, but the tips of the stem are shiny and do not look like the rest of the valve (actually you can see machining on the top of them). Lapped with original valves. Right now I don't have the money for a full set of valves and springs. Right now 198 and 200 shims are in the motor.
I figured it is basically mandatory for the shim to clear the retainer, if it werent, youd be pushing the retainer instead of the shim/valve, which may lead to unusual wear of the cotters, buckets, or other bad things? At least thats my line of thought. You had the easier adjustment, from small to large shims. What are the smallest shims available?
I figured it is basically mandatory for the shim to clear the retainer, if it werent, youd be pushing the retainer instead of the shim/valve, which may lead to unusual wear of the cotters, buckets, or other bad things? At least thats my line of thought. You had the easier adjustment, from small to large shims. What are the smallest shims available?
Last edited:
afm199
Well-known member
The valve is treated, but the tips of the stem are shiny and do not look like the rest of the valve. Lapped with original valves. Right now I don't have the money for a full set of valves and springs. Right now 198 and 200 shims are in the motor.
I figured it is basically mandatory for the shim to clear the retainer, if it werent, youd be pushing the retainer instead of the shim/valve, which may lead to unusual wear of the cotters, or other bad things? At least thats my line of thought. You had the easier adjustment, from small to large shims. What are the smallest shims available?
The bucket (cam follower) should have a post in it. The bucket post pushes on the shim which pushes on the valve tip.
Shims range from 120 to 320 or so
Your's are 7.5mm? If so let me know what shims you need. I have lots of those big ones.
Last edited:
AHhhhhhh yes it does have the post. Excellent. So happy my heads arent coming off. I don't even know exactly what shims I need right now. I need to buy a more accurate set of feeler gauges, and Im not in the bay area any more 
Last edited:
afm199
Well-known member
AHhhhhhh yes it does have the post. Excellent. So happy my heads arent coming off. I don't even know exactly what shims I need right now. I need to buy a more accurate set of feeler gauges, and Im not in the bay area any more
Not a problem. Let me know I will drop some in the mail, $2 each. (if they are 7.5 mm, not sure the VFR is/
elskipador
elskipador@gmail.com
the rc51 uses the bigger 9.48mm shims, not the smaller 7.48mm ones.
afm199
Well-known member
the rc51 uses the bigger 9.48mm shims, not the smaller 7.48mm ones.
I thought something was different. Dunno why.
the rc51 uses the bigger 9.48mm shims, not the smaller 7.48mm ones.
You are correct. Skip can I use you as a source for them when I figure out what I need?