• There has been a recent cluster of spammers accessing BARFer accounts and posting spam. To safeguard your account, please consider changing your password. It would be even better to take the additional step of enabling 2 Factor Authentication (2FA) on your BARF account. Read more here.

Reanimating a greybike RVF400 (NC35)

That sure doesn't look that bad.
:thumbup

Thanks, that's encouraging to hear. I will see if I can take better photos. My S4 phone is a dinosaur.
 
Last edited:
Yeah that's not bad at all. Better than mine was, and mines fine now.
 
For carb seals, I'd highly recommend LiteTek's viton seals. They fit my bike perfectly, and viton stands up to EtOH far better than rubber.

Thailand delivery! The kit arrived yesterday. Still working on getting the stubborn carbs apart. I feel like the brass jets are going to split or deform from the driver tip. I am using a flat driver that fits snuggly. I'll try to soften the varnish even more.

BTW the slide diaphragms seem good (no holes and flexible) but the extended thin rubber loop seal is a bit cracked. Can I make do with these? Is there a sealant that I can throw in when I reassemble or do I have to source new ones (if that's even an option)?
 
Pillion cables retrieved

You don't have the cable for the helmet. I was showing how it would be routed if you had it. The cable you have attaches to the pillion seat. Someone must have unscrewed it from the seat and just fastened both cable ends to the subframe.

Krooklyn, look what the cat dragged in...well actually it was already in. I went to the batcave to grab the pillion to make some measurements for a guy on the facebook RVF/VFR400 forum who needed some info. Anyway, I found the "rubber cable".

So my bike does have two looped cables: one rubber covered (newly discovered) and a bare one.

I'll figure out what goes where later.
 

Attachments

  • 2017-06-13 19.20.25 copy.jpg
    2017-06-13 19.20.25 copy.jpg
    64.9 KB · Views: 37
  • 2017-06-13 21.09.21.jpg
    2017-06-13 21.09.21.jpg
    68.3 KB · Views: 31
Guy must have burnt himself out progress posting or just got replacement parts to start working on the bike.
:laughing
 
It's been awhile

Thank for asking.

Short answer, not yet. Life happened: family vacation Australia, return to find Dad in hospital, terminal diagnosis, Dad passing. We've been helping Mom cope and manage with her huge life change. So many pieces to pick up.

Only this week is the numbness finally fading as we held Dad's memorial Saturday. Hardest thing I ever did.

I have many (all?) of the parts needed to put Humpty back together just need time and mindset to do it.

Sorry to hear about your dad. The bike has waited for a while already, she'll be there when you get back to it.
 
Thank for asking.

Short answer, not yet. Life happened: family vacation Australia, return to find Dad in hospital, terminal diagnosis, Dad passing. We've been helping Mom cope and manage with her huge life change. So many pieces to pick up.

Only this week is the numbness finally fading as we held Dad's memorial Saturday. Hardest thing I ever did.

I have many (all?) of the parts needed to put Humpty back together just need time and mindset to do it.

Damn. Not the type of response I was hoping for. :( Sorry to hear about your father. Seems like you've got your priorities straight.
 
As my family died off (I am now the last Mohican) I would bury myself in the garage long past midnight night after night just wrenchin'. . .made me feel better.

Then I sold the bikes off.

I still see 'em around sometimes, seeing those bikes being ridden gives me warmth.
 
Sorry to hear about your loss Rick.
Condolences to you and your family.
Keep your head up You know we all are here for you.
 
I can't wait to hear what 10 years of back fees are going to cost.
It drops out of the system after 6 years BUT will need to be inspected at the DMV.
 
Sorry about losing your Dad.

Takes a while for life to settle.
It will come back to you.
 
Thank for asking.

Short answer, not yet. Life happened: family vacation Australia, return to find Dad in hospital, terminal diagnosis, Dad passing. We've been helping Mom cope and manage with her huge life change. So many pieces to pick up.

Only this week is the numbness finally fading as we held Dad's memorial Saturday. Hardest thing I ever did.

I have many (all?) of the parts needed to put Humpty back together just need time and mindset to do it.

So sorry for your loss. Its really a tough thing to go through and glad you're able to be there for your mom. I'm 2 months out from losing my dad, and miss him every day. Hope things improve for you.
 
Thank you all for the kind words and condolences.

Pops was never much of a fan of my motorcycle riding but when I told him about the bike he was uncharacteristically interested and supportive of my project. He was intrigued how I came to own it, what made it special, and why would anyone lust after an old and non-running bike :)

In the end he said "You should do what makes you happy and be sure to hear a helmet!". Wise man he was.
 
DIY Auxiliary fuel tank

Several months ago my buddy reminded me that my carb testing will require an auxiliary fuel tank. I was like "what's that?". I searched the internet to find a $50 plastic bottle with tubing. What a rip! A recent BARF Garage forum post asked how to DIY an auxiliary fuel tank. Figured this would be one way to ease back into the rebuild.

Materials:
  1. Stainless steel or aluminum water bottle. I don't know about you but we have a bunch in our kitchen. They were all free giveaways. I have seen them at Goodwill, flea markets, garage sale, etc.
  2. Lawn mower fuelcock from amazon (2 for $7).
  3. Step bit. Can be used to drill a range of different sized holes with a single bit. Since each bit size drill holes less than 1/4″ deep, a step bit is mainly used for drilling thin material such as sheet metal. Bonus it doesn't have a helical grind so it doesn't grab the part like a conventional bit can on thin metal. Safety first! :thumbup
  4. Drill
  5. Deep socket + extender + hot melted to a nut drive handle :wtf
Process:
  1. Center punch hole location
  2. Drill hole
  3. Empty metal chips from bottle
  4. Insert fuelcock
  5. Place nut on socket contraption
  6. Turn bottle upside down and guide nut onto fuelcock filter
  7. Tighten nut
  8. Add tubing to valve. Done.

I think it better than the pre-made ones - mines got a mesh filter, fuelcock valve, metal construction, and it was a fun to do :teeth

When it comes time to use it I will need to crack the lid open a tiny bit to break any vacuum. BTW I tested if acetone would dissolve the plastic cap and it seemed impervious. I suspect it will be okay with gasoline. :rolleyes
 

Attachments

  • 2017-12-04 20.50.22.jpg
    2017-12-04 20.50.22.jpg
    104.6 KB · Views: 122
  • 2017-12-08 13.40.28.jpg
    2017-12-08 13.40.28.jpg
    97.4 KB · Views: 127
  • 2017-12-08 13.41.13.jpg
    2017-12-08 13.41.13.jpg
    82.4 KB · Views: 127
  • 2017-12-08 13.45.12.jpg
    2017-12-08 13.45.12.jpg
    86.3 KB · Views: 130
  • 2017-12-08 13.59.31.jpg
    2017-12-08 13.59.31.jpg
    99.2 KB · Views: 121
  • 2017-12-08 14.00.34.jpg
    2017-12-08 14.00.34.jpg
    72.7 KB · Views: 123
  • 2017-12-08 14.00.19.jpg
    2017-12-08 14.00.19.jpg
    87.4 KB · Views: 125
Get on that horse Rick. Can’t wait to see what comes next
 
Session 18: Sayonara Clifford

We’re back! After a long hiatus from this project I am picking things back up. Jessica has been away on business which has afforded me play time. :teeth

First things first, the days are short and working in an unpowered garage by flashlight was impossible. As usual it was Costco to the rescue. Surfing the aisles as I like to do I saw 4' LED lamp fixtures and a task lamp both on sale. Perfect! They were easy to install and make a GINORMOUS improvement to working conditions. Since the bat cave has no power I run a long extension cord to my neighbor. Needless to say, his $5/month charge is a no brainer. Thanks Nate! :thumbup

Easing into things slowly, I needed an easy project. Where to start. Hey let's see if the electrical system works. My NC27's battery transplanted right into the NC35's battery box. Battery connected, I held my breath and turned the key. Nothing happened. Nada. No lights, sounds anything. Damn! :(

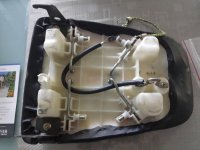
My attention turned to the alarm system stuffed in the rear storage tray area. The previous owner didn't provide an alarm remote so the system was useless to me and was, i hoped, serving as a kill switch. I certainly hoped this was the culprit and not something more serious.

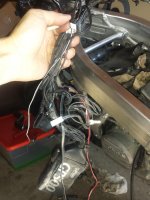
Starting at the alarm module I unscrewed two drywall screws used for mounting into the plastic tray :)mad I then followed a rather significant wiring bundle forward. It split into several smaller bundles each of which terminated into the factory wiring harness.

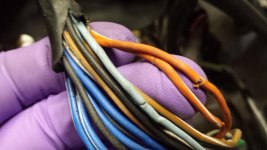
At each termination location I began the messy job of unwinding a lot of slimy electrical tape covered in black goo (my gloves were covered in tape adhesive gone bad). Once all the tape was removed I wiped down the factory harness wires clean with an acetone (my favorite!) soaked rag and put on a clean pair of gloves.

Next I unplugged a pair of quick tab disconnects and also carefully pried off several IDC wire taps. Close examination of the tap puncture sites revealed the strands of copper were intact and not cut! This was a huge relief. This meant that the current carrying capacity of the wires was preserved. However, I still need to seal up the insulation openings. I might try some RTV and silicone tape. Anyone have a better suggestion or product recommendation for patching damaged wire insulation?

Another section I had to cut, solder, splice and secure the wires with heatshrink tubing. The result is not pretty but functional and solid.

With the alarm module finally extricated the moment of truth. Would the instrument panel show any sign of life this time?

Huzzah! :party:party:party The first sign of life on the bike! Instrument panel lit, turn indicators, horn, neutral lamp, side stand, etc. I was stoked! There is hope. Since the tail and headlights were removed I will test later.

Then for a moment I was tempted to hit the starter but I knew better. I still had a ways to go before even attempting that.

I next plan to work on changing all fluids and exploring the engine's condition.
 

Attachments

  • NC35 Alarm out - 00 Lights 1.jpg
    NC35 Alarm out - 00 Lights 1.jpg
    102.5 KB · Views: 47
  • NC35 Alarm out - 01 Clifford 2.jpg
    NC35 Alarm out - 01 Clifford 2.jpg
    176.1 KB · Views: 43
  • NC35 Alarm out - 02 loom.jpg
    NC35 Alarm out - 02 loom.jpg
    84.6 KB · Views: 36
  • NC35 Alarm out - 03 tape and taps.jpg
    NC35 Alarm out - 03 tape and taps.jpg
    51.6 KB · Views: 47
  • NC35 Alarm out - 04 tape and taps.jpg
    NC35 Alarm out - 04 tape and taps.jpg
    75.3 KB · Views: 47
  • NC35 Alarm out - 05 taps.jpg
    NC35 Alarm out - 05 taps.jpg
    210.8 KB · Views: 49
  • NC35 Alarm out - 06 alarm out.jpg
    NC35 Alarm out - 06 alarm out.jpg
    100.1 KB · Views: 42
  • NC35 Alarm out - 07 Lights on.jpg
    NC35 Alarm out - 07 Lights on.jpg
    157.3 KB · Views: 50
Last edited:
Back
Top