-
There has been a recent cluster of spammers accessing BARFer accounts and posting spam. To safeguard your account, please consider changing your password. It would be even better to take the additional step of enabling 2 Factor Authentication (2FA) on your BARF account. Read more here.
You are using an out of date browser. It may not display this or other websites correctly.
You should upgrade or use an alternative browser.
You should upgrade or use an alternative browser.
Reanimating a greybike RVF400 (NC35)
- Thread starter RVFRick
- Start date
thenewwazoo
esculenta delicta
Well done! You should wire that alarm up on the bench so you can re-live the sounds of the ninetys!
Whooooop whoooop blah blah blah blah booo beee booo beee bweuweuweuweuweu ....
Whooooop whoooop blah blah blah blah booo beee booo beee bweuweuweuweuweu ....
RVFRick
Active member
- Joined
- Nov 6, 2016
- Location
- Palo Alto
- Moto(s)
- '20 690 SMC R, '16 FZ-07, '96 & '94 NC35, 2X '94 NSR250R SE, '90 GB500TT, '90 CB-1, '82 C70
- Name
- Richard
Well done! You should wire that alarm up on the bench so you can re-live the sounds of the ninetys!
Whooooop whoooop blah blah blah blah booo beee booo beee bweuweuweuweuweu ....

I'll save it from the landfill in case I get bored some day.
RVFRick
Active member
- Joined
- Nov 6, 2016
- Location
- Palo Alto
- Moto(s)
- '20 690 SMC R, '16 FZ-07, '96 & '94 NC35, 2X '94 NSR250R SE, '90 GB500TT, '90 CB-1, '82 C70
- Name
- Richard
Session 19: Spark Plugs and Oil Change
I changed the oil with 2.6 quarts of Lucas 10W-40 synthetic oil. A straight up affair requiring a funnel, oil drain pain, oil filter and a strap wrench. The filter was in a confined space but a strap wrench made it easy. The drain bolt yielded easily to a 13mm socket on a 10" ratchet. Old oil poured out and looked rather dark.
I placed a neodymium magnet in the drain path to fish for any evidence of damage or wear. Fortunately, the magnet stayed clean and metal free (ferrous metal at least)
I will cut open the filter when I get a hacksaw.
I inspected the engine side O-ring face and wiped it down. Clean and smooth. Lubed the gasket and screwed on a Hi-Flo brand filter. Cinched it up snug but not over tightened. Ditto the drain plug. I reused the old crush washer. I hope it holds. I poured in 2.6quarts of oil and called it a wrap.
Moving on, I removed the spark plugs using a deep socket 13mm on an extension. They were all rather loose - I expected more resistance. I bet I could’ve removed them without the wrench handle leverage. Odd. The plugs don’t lift out with the socket so I use a magnet to pull them out of their recesses. Inspecting the plugs they have a layer of dark oily around the threads and around the electrode. I have no idea how to interpret this.
An unexpected finding: on the left side of the valve head casting I see what appears to be a hole and an oil stain line emanating from it . It's hard to look at head on because the frame is in the way. Should I be concerned? The stain is dark and not thick with build-up.
I changed the oil with 2.6 quarts of Lucas 10W-40 synthetic oil. A straight up affair requiring a funnel, oil drain pain, oil filter and a strap wrench. The filter was in a confined space but a strap wrench made it easy. The drain bolt yielded easily to a 13mm socket on a 10" ratchet. Old oil poured out and looked rather dark.
I placed a neodymium magnet in the drain path to fish for any evidence of damage or wear. Fortunately, the magnet stayed clean and metal free (ferrous metal at least)
I will cut open the filter when I get a hacksaw.
I inspected the engine side O-ring face and wiped it down. Clean and smooth. Lubed the gasket and screwed on a Hi-Flo brand filter. Cinched it up snug but not over tightened. Ditto the drain plug. I reused the old crush washer. I hope it holds. I poured in 2.6quarts of oil and called it a wrap.
Moving on, I removed the spark plugs using a deep socket 13mm on an extension. They were all rather loose - I expected more resistance. I bet I could’ve removed them without the wrench handle leverage. Odd. The plugs don’t lift out with the socket so I use a magnet to pull them out of their recesses. Inspecting the plugs they have a layer of dark oily around the threads and around the electrode. I have no idea how to interpret this.
An unexpected finding: on the left side of the valve head casting I see what appears to be a hole and an oil stain line emanating from it
. It's hard to look at head on because the frame is in the way. Should I be concerned? The stain is dark and not thick with build-up.Attachments

Whammy
Veteran of Road Racing
- Joined
- Jun 17, 2003
- Location
- Nampa Idaho
- Moto(s)
- 2012 CBR1000RR
2018 Ducati Hypermotard 939SP
- BARF perks
- AMA #3283620
Getting close ")
RVFRick
Active member
- Joined
- Nov 6, 2016
- Location
- Palo Alto
- Moto(s)
- '20 690 SMC R, '16 FZ-07, '96 & '94 NC35, 2X '94 NSR250R SE, '90 GB500TT, '90 CB-1, '82 C70
- Name
- Richard
Could that be a weep hole from the spark plug recess?
Lets the water drain out if it gets full.
If the plug was loose, oil would follow the same path.
Hmm, will check if this is true.
RVFRick
Active member
- Joined
- Nov 6, 2016
- Location
- Palo Alto
- Moto(s)
- '20 690 SMC R, '16 FZ-07, '96 & '94 NC35, 2X '94 NSR250R SE, '90 GB500TT, '90 CB-1, '82 C70
- Name
- Richard
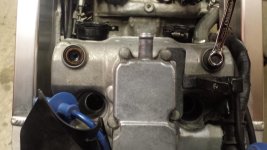
Session 20: Valve covers off
Now that the engine is topped off with fresh oil I can focus on how best to lubricate the moving engine bits. Important parts like cylinders, crankshaft, valves, etc are probably dry? How, what and where do I focus?
I turned to the BARF Garage gurus to get advice and came up with a plan: remove the spark plugs, squirt oil on to the cylinders, valves, then rotate engine to get juices flowing. In a moment of laziness I thought to avoid removing the valve covers thinking that disturbing the gaskets would require replacement. If the rubber was cracked and brittle and I'd have to wait 2-3 weeks for parts to come in the mail. I'm now glad that I followed the advice of teh BARFers.
4 bolts secured each of the two covers. A 10mm socket was all it took to remove them. They lifted off easily and revealed an mechanical orgy of cams shafts, lobes, gears, springs, valves, etc. Aha! I finally understood and saw up close the source of the RVF’s iconic engine whine: gear driven cams.
To see if there was any oil coating the parts I swiped my rubber gloved finger across a cam lobe - it remained matte dull. Not a hint of shininess on the glove. Gravity plus time moved the oil to the bottom of the engine. The only oil up in the valves was oil caught in the recesses of bolt heads.
I looked at the valve cover gaskets and see that they are still soft and flexible. Yay! I plan to reuse them if the new gaskets don’t arrive soon. I peeled them off the diecast covers but found them adhered with some sort of sealant. Reading the Haynes manual I se that they recommend a smear of sealant on these gaskets prior to installation onto the covers. The sealing groove in the cover castings are not perfect which may explain the need for sealant. I used acetone and a rag to help peel off the old sealant.
One thing I definitely would do before starting any project is washing the bike and hosing off as much grime as possible. Working on clean stuff is always better and easier.
The outside of my valve covers were grimy so I spent some time cleaning them up with some fine steel wool. They look much nicer clean.
Attachments
-
 NC35 Valve cover off 01.jpg80.4 KB · Views: 35
 -
 NC35 Valve cover off 02 bolt removal.jpg51.7 KB · Views: 38
 -
 NC35 Valve cover off 03 off.jpg82.7 KB · Views: 36
 -
 NC35 Valve cover off 04.jpg79.9 KB · Views: 41
 -
 NC35 Valve cover off 06.jpg68.8 KB · Views: 42
 -
 NC35 Valve cover off 05.jpg85.6 KB · Views: 41
 -
 NC35 Valve cover off 07.jpg79 KB · Views: 35
 -
 NC35 Valve cover off 08 gasket.jpg35.5 KB · Views: 31
 -
 NC35 Valve cover off 09 gasket.jpg70.9 KB · Views: 35
Last edited:
RVFRick
Active member
- Joined
- Nov 6, 2016
- Location
- Palo Alto
- Moto(s)
- '20 690 SMC R, '16 FZ-07, '96 & '94 NC35, 2X '94 NSR250R SE, '90 GB500TT, '90 CB-1, '82 C70
- Name
- Richard
Session 21: Getting juices flowing
This session’s work happened Christmas Eve. The stars were aligned: borrowed electricity and newly installed lighting meant I could now work at nights, Jessica was overseas on a biz trip, the kids were chilling at home. A perfect excuse to play in the bat cave!
In my previous session I learned that a sitting engine is unprotected by oil. I knew it was important to lube up the engine before starting it. I decided to progress cautiously so as to reduce any risk of damage.
I oil can squirted a tablespoon’s worth of oil into each cylinder and slathered the valve train. Easy! Next: work the engine gently and circulate the oil. BARF Garage posters offered suggestions to build oil pressure some recommending running the starter, others turning a wrench. I opted to use the drivetrain reasoning I could get better leverage and feel. I thought a starter might be too fast and harsh while using a wrench too slow and tedious. Maybe it really didn’t matter. In any case, leaving the plugs out would make it easier to turn the engine because there would be no resistance from having to compress gasses.
With the engine squirted down, and tranny in neutral I roll the bike out of the cave and along the driveway. 150’ and I am now the street trying to catch my breath. Holy crap the bike feels porky and so do I . It has a high rolling resistance - I bet the tires needed air. I recover after a minute...maybe five
  . Steadying the bike is tricky when you’re light headed. I try my best not to drop the bike.
Let’s do this. Tapping the shifter lever I put her into 6th gear. Shove off down the street, pop the clutch, PUSH!!! The engine turns but I can’t see what’s going on. Are the cams and pistons moving? It’s dark here - the streetlight is far away and there is almost no moonlight. I’m leaned way forward pumping my oldman legs trying to keep the bike rolling. I listen, the first 15 feet is mostly silent and then I hear some gurgling noises. Hey its the sound of the pistons pushing and sucking. A Honda V4 as you've never heard. I think the oil pump has built pressure. After just 30 yards of this I am spent. I stop and suck wind for several minutes barely able to hold myself up let alone the bike. I could use Santa’s reindeers right about now. Meanwhile I’m hoping the neighbors don’t mistake me for a bike thief and call the cops. https://youtu.be/yXohKc-lDF8
I finally regain my composure, and turn the bike around for the return trip back to the garage. I manage to make it back alive and coast her into a Baxley chock (on loan from BARFer & build buddy, APF).
I collapse onto a stool in a full on sweat wheezing and redfaced. Under the shop lights the valvetrain looks happily lubed. Me thinks the oil pump works and the engine's thirst for oil has been slaked.
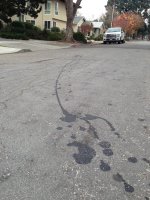
Then triumph turns to. I see oil dripping on the garage floor and why is it dripping from the radiator? Why is the radiator all shiny?! I hurry grab some cardboard and slide it under the bike. Oh crap it’s dripping in back, too! I place more cardboard on the ground. Where’s all this oil coming from? I see oil dripping from the chain and the radiator. I grab a rag and try to catch what I can. It turns out that with valve covers off, the oil flow is not contained, shall I say, very well. Hindsight is always 20/20. Also, with the V4’s layout the forward cylinder section is at a 60 degree tilt so any oil easily spills over. There must be a snail trail of oil along the street and driveway. Big oops. If there ever is a next time I will do this in the daylight.
So at least the good news is the engine is oiled up and that much closer to firing up. I'll be sure to top off any lost oil.
Next up…..valve check.
This session’s work happened Christmas Eve. The stars were aligned: borrowed electricity and newly installed lighting meant I could now work at nights, Jessica was overseas on a biz trip, the kids were chilling at home. A perfect excuse to play in the bat cave!
In my previous session I learned that a sitting engine is unprotected by oil. I knew it was important to lube up the engine before starting it. I decided to progress cautiously so as to reduce any risk of damage.
I oil can squirted a tablespoon’s worth of oil into each cylinder and slathered the valve train. Easy!
Next: work the engine gently and circulate the oil. BARF Garage posters offered suggestions to build oil pressure some recommending running the starter, others turning a wrench. I opted to use the drivetrain reasoning I could get better leverage and feel. I thought a starter might be too fast and harsh while using a wrench too slow and tedious. Maybe it really didn’t matter. In any case, leaving the plugs out would make it easier to turn the engine because there would be no resistance from having to compress gasses. With the engine squirted down, and tranny in neutral I roll the bike out of the cave and along the driveway. 150’ and I am now the street trying to catch my breath. Holy crap the bike feels porky and so do I
. It has a high rolling resistance - I bet the tires needed air. I recover after a minute...maybe five . Steadying the bike is tricky when you’re light headed. I try my best not to drop the bike. Let’s do this. Tapping the shifter lever I put her into 6th gear. Shove off down the street, pop the clutch, PUSH!!! The engine turns but I can’t see what’s going on. Are the cams and pistons moving? It’s dark here - the streetlight is far away and there is almost no moonlight. I’m leaned way forward pumping my oldman legs trying to keep the bike rolling. I listen, the first 15 feet is mostly silent and then I hear some gurgling noises. Hey its the sound of the pistons pushing and sucking. A Honda V4 as you've never heard. I think the oil pump has built pressure. After just 30 yards of this I am spent. I stop and suck wind for several minutes barely able to hold myself up let alone the bike. I could use Santa’s reindeers right about now. Meanwhile I’m hoping the neighbors don’t mistake me for a bike thief and call the cops. https://youtu.be/yXohKc-lDF8
I finally regain my composure, and turn the bike around for the return trip back to the garage. I manage to make it back alive and coast her into a Baxley chock (on loan from BARFer & build buddy, APF).
I collapse onto a stool in a full on sweat wheezing and redfaced. Under the shop lights the valvetrain looks happily lubed. Me thinks the oil pump works and the engine's thirst for oil has been slaked
. Then triumph turns to
. I see oil dripping on the garage floor and why is it dripping from the radiator? Why is the radiator all shiny?! I hurry grab some cardboard and slide it under the bike. Oh crap it’s dripping in back, too! I place more cardboard on the ground. Where’s all this oil coming from? I see oil dripping from the chain and the radiator. I grab a rag and try to catch what I can. It turns out that with valve covers off, the oil flow is not contained, shall I say, very well. Hindsight is always 20/20. Also, with the V4’s layout the forward cylinder section is at a 60 degree tilt so any oil easily spills over. There must be a snail trail of oil along the street and driveway. Big oops. If there ever is a next time I will do this in the daylight.So at least the good news is the engine is oiled up and that much closer to firing up. I'll be sure to top off any lost oil.
Next up…..valve check.
Attachments


Last edited:
Sharky
Well-known member
Lesson learned right thar...This session’s work happened Christmas Eve. The stars were aligned: borrowed electricity and newly installed lighting meant I could now work at nights, Jessica was overseas on a biz trip, the kids were chilling at home. A perfect excuse to play in the bat cave!
In my previous session I learned that a sitting engine is unprotected by oil. I knew it was important to lube up the engine before starting it. I decided to progress cautiously so as to reduce any risk of damage.
I oil can squirted a tablespoon’s worth of oil into each cylinder and slathered the valve train. Easy!
With the engine squirted down, and tranny in neutral I roll the bike out of the cave and along the driveway. 150’ and I am now the street trying to catch my breath. Holy crap the bike feels porky and so do I
Let’s do this. Tapping the shifter lever I put her into 6th gear. Shove off down the street, pop the clutch, PUSH!!! The engine turns but I can’t see what’s going on. Are the cams and pistons moving? It’s dark here - the streetlight is far away and there is almost no moonlight. I’m leaned way forward pumping my oldman legs trying to keep the bike rolling. I listen, the first 15 feet is mostly silent and then I hear some gurgling noises. Hey its the sound of the pistons pushing and sucking. A Honda V4 as you've never heard. I think the oil pump has built pressure. After just 30 yards of this I am spent. I stop and suck wind for several minutes barely able to hold myself up let alone the bike. I could use Santa’s reindeers right about now. Meanwhile I’m hoping the neighbors don’t mistake me for a bike thief and call the cops. https://youtu.be/yXohKc-lDF8
I finally regain my composure, and turn the bike around for the return trip back to the garage. I manage to make it back alive and coast her into a Baxley chock (on loan from BARFer & build buddy, APF).
I collapse onto a stool in a full on sweat wheezing and redfaced. Under the shop lights the valvetrain looks happily lubed. Me thinks the oil pump works and the engine's thirst for oil has been slaked
Then triumph turns to
So at least the good news is the engine is oiled up and that much closer to firing up. I'll be sure to top off any lost oil.
Next up…..valve check.
RVFRick
Active member
- Joined
- Nov 6, 2016
- Location
- Palo Alto
- Moto(s)
- '20 690 SMC R, '16 FZ-07, '96 & '94 NC35, 2X '94 NSR250R SE, '90 GB500TT, '90 CB-1, '82 C70
- Name
- Richard
Lesson learned right thar...
I am learning soooo many lessons the hard way. Some are too embarrassing to share
 .
.Glad I'm still having fun.
Last edited:
RVFRick
Active member
- Joined
- Nov 6, 2016
- Location
- Palo Alto
- Moto(s)
- '20 690 SMC R, '16 FZ-07, '96 & '94 NC35, 2X '94 NSR250R SE, '90 GB500TT, '90 CB-1, '82 C70
- Name
- Richard
Session 22: Valves
I performed my first valve check last weekend. It was worth the effort. I now know why, what and how of adjusting valves. I prepared by studying the Haynes manual.  50% of it made sense I figured it would all become clear once I started for real. I followed the manual step-by-step but still managed to make a few mistakes along the way.
This is not a job that you can rush or do late at night. It took me an hour to get my bearings and finally understand what I was doing. BTW, don’t do a valve job when you have a full bladder . Not good for concentration. Wish the bat cave had a nearby bathroom.
I made a spreadsheet to track my measurements and laid out the cells as a crude representation of the engine layout – cylinders 2&4 at the top and 1 &3 at the bottom as there were many parts identically appearing parts to differentiate. The spreadsheet helped me track progress and what to do next. Being extra paranoid, I marked the cylinders with a Sharpie.
The measurement and adjustment process is not difficult but tedious and exacting. The NC35 valve head is a densely packed area making it hard to see. Lots of intricate parts that required good lighting. I positioned four of those free Harbor Freight flashlights and they worked beautifully - easy to hand or clip via magnet and small enough to nestle in the right places.
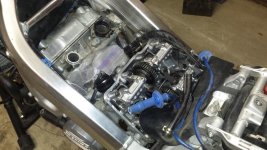
Let’s do it. Remove top radiator to gain access to the forward cylinder bank. Found a damaged hose – add to shopping list. Off came the timing port cap. Kneel on the pavement and stoop to get a straight on view into the timing wheel. Put a socket on the timing wheel and turned clockwise (I suppose turning CC would unscrew the bolt, didn’t want to find out) to carefully line up correct timing mark with notches (confusing as there are two one for TDC the other “F” for firing). Check timing mark on end of cam shaft as it can end up in either one of two positions depending on which cylinder you’re working on to put a cylinder at top dead center (TDC). You have to do this for each of the four cylinders.
My feeler gauge set required stacking multiple blades to build to a certain thickness. An utter pain in the ass. Next time I’m using full thickness gauges because stacking and adding up thin metal gauges is suboptimal. I also learned about “go-no-go feeler gauges” on YouTube AFTER I finished. I plan to buy a set for next time.
At first my progress was slow not really knowing how or where to measure and differentiating the feel (so that's why they're called feeler gauges ya dope!) of a loose vs a snug fit. It took a while before I finally got the hang of it. 15 valves checked and only one more to go. Then Murphy showed up right on cue: all valves were with in tolerance EXCEPT for the last one I checked. Seriously? Valve 16 measured undersize. I understand a larger gap (carbon build-up) but undersized makes no sense. Anyone care to educate?
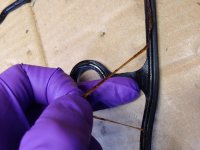
Since the measurement was low I decided to swap shims with a position which measured high. The worksheet made it easy to select a donor valve position. I exposed the target shims by wedging the rocker in the “open” position. The next part of extracting the shim was reminiscent of the Milton Bradley board game “Operation”. Take out “Wrenched Ankle”.
I first tried tweezers to lift the shim from its recess but quickly learned that was a bad idea. Shims are tiny slippery things. A tweezer’s squeeze and could easily shoot a shim across the garage or worse, into the engine. Dropping a shim in there would major suck because I'd have to find it and then somehow fish it out. Yikes! I wonder how often “professionals” drop a shim.
Haynes recommends coving any engine openings with a towel. So I did this and also I stuffed rubber gloves into all open ports. I also improvised a magnetic catcher (magnet on a stick) just in case. Even though the magnet was a super strong ½” diameter neodymium it wasn’t strong enough to lift a shim from it’s recess. I hopd that maybe I could pick it out. Rummaged through the tool chest and chose an X-acto as a decent tool. Before prying I positioned the magnet in close proximity to the shim. Held my breath, pried and “Click!” Shim out and caught by magnet. Whew! Easy! Repeat at other valve.
With both shims out I next had to swap their positions. Installing a shim was easy but no less nerve racking. The magnet was too strong and uncontrolled to be usedful. Haynes suggested using a screw driver and grease. I stuck a shim onto a greased skinny spatula (great tool, long, strong and thin) l, then carefully guided the spatula and it's 7mm diameter cargo just above and into the shallow shim recess. Sliding the spatula sideways deposited the shim in place. I then carefully released the springloaded valve rocker over the shim to prevent it from falling out. Mission accomplished! Shims installedartyartyarty I re-measured ALL of the valves. It went faster because I knew what gaps to expect. All confirmed within tolerance. I was good to go. In the end the valve adjustment job took 3 hours but at least I didn't lose any parts into the engine.
With the job completed quickly put away most of the tools, slammed the garage door shut, ran to my car, and made a bee line for the nearest public bathroom
I performed my first valve check last weekend. It was worth the effort. I now know why, what and how of adjusting valves.
I prepared by studying the Haynes manual. 50% of it made sense I figured it would all become clear once I started for real. I followed the manual step-by-step but still managed to make a few mistakes along the way.This is not a job that you can rush or do late at night. It took me an hour to get my bearings and finally understand what I was doing. BTW, don’t do a valve job when you have a full bladder
. Not good for concentration. Wish the bat cave had a nearby bathroom.I made a spreadsheet to track my measurements and laid out the cells as a crude representation of the engine layout – cylinders 2&4 at the top and 1 &3 at the bottom as there were many parts identically appearing parts to differentiate. The spreadsheet helped me track progress and what to do next. Being extra paranoid, I marked the cylinders with a Sharpie.
The measurement and adjustment process is not difficult but tedious and exacting. The NC35 valve head is a densely packed area making it hard to see. Lots of intricate parts that required good lighting. I positioned four of those free Harbor Freight flashlights and they worked beautifully - easy to hand or clip via magnet and small enough to nestle in the right places.
Let’s do it. Remove top radiator to gain access to the forward cylinder bank. Found a damaged hose – add to shopping list. Off came the timing port cap. Kneel on the pavement and stoop to get a straight on view into the timing wheel. Put a socket on the timing wheel and turned clockwise (I suppose turning CC would unscrew the bolt, didn’t want to find out) to carefully line up correct timing mark with notches (confusing as there are two one for TDC the other “F” for firing). Check timing mark on end of cam shaft as it can end up in either one of two positions depending on which cylinder you’re working on to put a cylinder at top dead center (TDC). You have to do this for each of the four cylinders.
My feeler gauge set required stacking multiple blades to build to a certain thickness. An utter pain in the ass. Next time I’m using full thickness gauges because stacking and adding up thin metal gauges is suboptimal. I also learned about “go-no-go feeler gauges” on YouTube AFTER I finished. I plan to buy a set for next time.
At first my progress was slow not really knowing how or where to measure and differentiating the feel (so that's why they're called feeler gauges ya dope!) of a loose vs a snug fit. It took a while before I finally got the hang of it. 15 valves checked and only one more to go. Then Murphy showed up right on cue: all valves were with in tolerance EXCEPT for the last one I checked. Seriously? Valve 16 measured undersize. I understand a larger gap (carbon build-up) but undersized makes no sense. Anyone care to educate?
Since the measurement was low I decided to swap shims with a position which measured high. The worksheet made it easy to select a donor valve position. I exposed the target shims by wedging the rocker in the “open” position. The next part of extracting the shim was reminiscent of the Milton Bradley board game “Operation”. Take out “Wrenched Ankle”.
I first tried tweezers to lift the shim from its recess but quickly learned that was a bad idea. Shims are tiny slippery things. A tweezer’s squeeze and could easily shoot a shim across the garage or worse, into the engine. Dropping a shim in there would major suck
because I'd have to find it and then somehow fish it out. Yikes! I wonder how often “professionals” drop a shim.Haynes recommends coving any engine openings with a towel. So I did this and also I stuffed rubber gloves into all open ports. I also improvised a magnetic catcher (magnet on a stick) just in case. Even though the magnet was a super strong ½” diameter neodymium it wasn’t strong enough to lift a shim from it’s recess. I hopd that maybe I could pick it out. Rummaged through the tool chest and chose an X-acto as a decent tool. Before prying I positioned the magnet in close proximity to the shim. Held my breath, pried and “Click!” Shim out and caught by magnet. Whew! Easy! Repeat at other valve.
With both shims out I next had to swap their positions. Installing a shim was easy but no less nerve racking. The magnet was too strong and uncontrolled to be usedful. Haynes suggested using a screw driver and grease. I stuck a shim onto a greased skinny spatula (great tool, long, strong and thin) l, then carefully guided the spatula and it's 7mm diameter cargo just above and into the shallow shim recess. Sliding the spatula sideways deposited the shim in place. I then carefully released the springloaded valve rocker over the shim to prevent it from falling out. Mission accomplished! Shims installed
artyartyarty I re-measured ALL of the valves. It went faster because I knew what gaps to expect. All confirmed within tolerance. I was good to go. In the end the valve adjustment job took 3 hours but at least I didn't lose any parts into the engine.With the job completed quickly put away most of the tools, slammed the garage door shut, ran to my car, and made a bee line for the nearest public bathroom
Attachments
-
 05 Tools.jpg72.3 KB · Views: 69
 -
 04 Cam ends.jpg90.1 KB · Views: 44
 -
 03 Notch and timing wheel.jpg82.9 KB · Views: 59
 -
 02 timing cap removed.jpg75.6 KB · Views: 46
 -
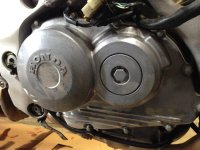 01 right crankcase cover.jpg82 KB · Views: 39
 -
 06 Feeler guages.jpg69.3 KB · Views: 50
 -
 07 Grease shim.jpg72.4 KB · Views: 58
 -
 08 Rocker pushed aside.jpg66.5 KB · Views: 55
 -
 09 Valve worksheet.JPG81 KB · Views: 64
295566
Numbers McGee
Valve clearances tend to decrease, or tighten, over time. This is because the valve seat can sometimes deteriorate (slowly) over time, which "lifts" the valve higher in the cylinder head, reducing valve lash, or requiring the clearance to be increased. I think everytime I've had to adjust valves, they've always had to be loosened. That's also why most will say looser is better than tighter, when it comes to valve adjustments.
RVFRick
Active member
- Joined
- Nov 6, 2016
- Location
- Palo Alto
- Moto(s)
- '20 690 SMC R, '16 FZ-07, '96 & '94 NC35, 2X '94 NSR250R SE, '90 GB500TT, '90 CB-1, '82 C70
- Name
- Richard
Thanks for the info. I have yet to see a valve seat in person but I get the idea and suggestion for shooting for the wider gap. Anyways, I'll be sure to faithfully follow the recommended maintenance schedule.
Any realistic reason to set gaps evenly or just being within tolerance good enough?
Any realistic reason to set gaps evenly or just being within tolerance good enough?
ScottRNelson
Adventure and Dual Sport
It's more work to try to get them perfect than to get them "good enough". You have to decide which you want. Personally, I would go with good enough.Any realistic reason to set gaps evenly or just being within tolerance good enough?
thenewwazoo
esculenta delicta
The NC V4s are particularly sensitive to valve gap. It’s worth the work to get them dead in the middle of the range.
RVFRick
Active member
- Joined
- Nov 6, 2016
- Location
- Palo Alto
- Moto(s)
- '20 690 SMC R, '16 FZ-07, '96 & '94 NC35, 2X '94 NSR250R SE, '90 GB500TT, '90 CB-1, '82 C70
- Name
- Richard
The NC V4s are particularly sensitive to valve gap. It’s worth the work to get them dead in the middle of the range.
. Are you speaking from experience with your RVF and/or other V4s? Curious to know why NC V4s more than any other engine?I am in spec right now. I think about it this way, the manual calls for a gap range of 0.06 millimeters, that's 60% of a Post-It note (0.1mm). Mind you this is the min-max range and mine are actually even less than that, say half a Post-it. That's damn thin! Plus I don't plan on stressing my engine too badly. At least to start.
If I was more OCD I'd match all the gaps, but I'm betting the valves should perform fine.
Uh oh, now I've cursed myself and there will be a point where I'm stranded on the side of the road and someone says "Hey, you do know that your bike needs equalized valve gaps, right?"
Carb rebuild next.
thenewwazoo
esculenta delicta
I should have taken a bit more time to write. Sorry for the kinda-sorta drive-by.
I've heard from the grapevine that the NC is sensitive to its valve gap in terms of making the most power, especially when hammering the valves up around the 16k (HRC CDI) redline. The spec is the spec and there's nothing wrong with keeping it in spec if you're not chasing horses, but my attitude is while-you're-in-there etc. You're definitely not going to get stranded. But I might pull away from you down the front straight at Thill
I've heard from the grapevine that the NC is sensitive to its valve gap in terms of making the most power, especially when hammering the valves up around the 16k (HRC CDI) redline. The spec is the spec and there's nothing wrong with keeping it in spec if you're not chasing horses, but my attitude is while-you're-in-there etc. You're definitely not going to get stranded. But I might pull away from you down the front straight at Thill
thenewwazoo
esculenta delicta
I will say this, though. Take the time to balance your carbs. That will fill you with regret when you figure the #4 is such a pain, so fuck it, that's good enough, and then it runs like shit when it's cold because the #4 doesn't like to fire off because it keeps fouling the plug and why does it keep doing that goddamnit ... 