• There has been a recent cluster of spammers accessing BARFer accounts and posting spam. To safeguard your account, please consider changing your password. It would be even better to take the additional step of enabling 2 Factor Authentication (2FA) on your BARF account. Read more here.

working title: gl1000

in the continuing RTV saga, we have the valve covers
these bikes have a reuseable rubber gasket sealing the valve covers. nothing needed to help them do their job, unless maybe you own stock in RTV manufacturers or watched too many luxury car commercials in the 1990s where they welded the hood shut to emphasize how little maintenance was needed? bullshit but whatever.

was :barf :
note burned on black oil residue
picture.php


fortunately the seized engine was assembled by someone that understood how rubber gaskets work so i just swapped valvecovers, saving untold hours of cleaning (note lack of burned on oil residue)
is:
picture.php


i could kind-of understand a LITTLE rtv smear if the surfaces were dinged up (how someone would ding them up i have no clue) but this is definitely overkill. fortunately none of it broke off and got to the oil pump (yet)

was:
picture.php


"clean enough" is:
when i go back and do the timing belts and check valve clearances i'll clean this up some more
picture.php


wtf. why. this is the ignition points housing. zero need for added sealing there. maybe it was supposed to be a submarine?

picture.php


anyway, here is how it sits now. waterpump cover reinstalled with stainless SHCS instead of the stupid cheese grade JIS phillips-esque screws. i even had a new oil filter in the pile o parts!!! reused the least crappy water pump tho because why not?

picture.php


i am tempted to take the parts from the seized engine and un-fuck the RTV-a-palooza mess of the coolant crossover tubes and thermostat houseing on top but it doesn't appear to have been leaking and that assembly is famous for being really picky about how it's assembled.... but it is on the bench. it'd be smart to do it now right?
 
I first wanted to say props for taking on such a dirty mess of a project.:thumbup

I noticed your comment over on the general channel about possibly building something for Dirtbag... is this it? If so, keep up the good work, the clock is ticking now:party
 
well i am certainly not going to be able to find another pile of parts in time.... and my plans since starting this thread were completely different than the ones now in my head post-dirtbag announcement so yeah. i'm aiming for dirtbag!
 
one way or another i'll make it to the ride-off to at least see the entries. might not be able to do the event due to Life Reasons but being the last one i am going to do whatever i can to make the ride too.
 
well. i guess it's good i looked. more RTV of course, to supplement the sheared o-rings?

no thermostat in the housing. :shrug

all the parts will be transferred from the other engine so no biggie really. however, not pictured. is a broken bolt in the block that secures the thermostat housing. i bollocksed it up and have not made a plan yet. I'll get some better bolt extractors first once i acquire them. I'm pretty sure i fucked the threads in the case so i might be converting this screw into a threded stud. the previous mechanic omitted the fastener entirely. and used SAE fasteners on one of the other locations. hey, cross threaded is like locktite right?!

picture.php
 
Last edited:
Broken bolts... cross threaded bolts... SAE bolts in metric holes... this says Dirtbag everywhere :party
 
oh yeah. no doubt. the fix for the thermostat housing broken bolt hole was to kinda thread the resulting off-center hole to M6 (correct size) and spin the screw in like it's supposed to be a friction fit. perfect.

i'm contemplating a dirveway neck stretch without a laser or a frame jig.. very dirtbaggy
 
I just checked in to see Auntie's level of suffering.

I'm satisfied for now.
 
no pictures but i do have some words

i got the valves adjusted and new timing belts on. oddly, to me, all the intake valves were tight and all the exhausts were loose. like really loose.

but where was the RTV? it was on the flywheel, inside the crank case. likely some got smeared on it when the case halves were re-joined.
 
started into some writing tonight, the UNDOING phase, investigating what the PO did which isn't too terrible. mostly it is stock and i just need to pull the main harness away from where the Next Phase happens where i need a cess to the back one of the frame


I liked the term, pecker marks...

Mr. Bling, sir. I know we're supposed to use our words, but please bring pics.

just for you: RTV on a flywheel

tangent:
this bike
https://bayarearidersforum.com/forums/showthread.php?t=529679

is for sale again
https://sfbay.craigslist.org/pen/mpo/d/fremont-1978-kawasaki-kz1000/7518693722.html

when i divested ~3 yeaes ago it needed some catchup maintenance but still ran and it was a very solid bike on the dirtbag ride. it would be wise to plan on resealing the bevel drive though. it started leaking when it got warm which is t surprising for a bije that sat a LOT before i got it going again.... it'd be easier than foxing up this pile I'm working on that's for sure. hummm. i wonder if the wofe would. otice if it showed up again?
 

Attachments

  • rps20220808_210113.jpg
    rps20220808_210113.jpg
    133.8 KB · Views: 5
Last edited:
well. it's update time and i am here to say I will finish this bike before the 21st DBC, but not before the 20th. with ~4 weeks left and so fsr averaging ~2 hours per week available to work on this bike it just ain't happeneing. not safely anyway

that said, the frame is 1/3 cut so that's something?

aside: its a good thing honda isnt in aerospace. at least 1970s honda.
"the frame is flimsy should we throw mass at it?
"we already did!!! is ist still flimsy?!?!"

these frame members where they smash the ends of the tube and stuff a tube inside of a tube to be plug welded. OMG the effective tube wall thickness is nearly 1/4"

at least it makes modification pretty forgiving. if you blow through a frame tube the entire bike is probably molten
 

Attachments

  • rps20220823_201000.jpg
    rps20220823_201000.jpg
    58.7 KB · Views: 13
ok. this project isn't dead.
i'm going to take some credit again for progress i made YEARS ago, but since i put it down in the mean time there was some measure of starting over inertia that had to be overcome.

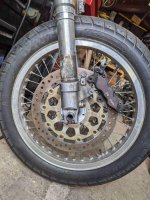
i decided that the front end had to come off of the bike to finish welding the frame mods because i needed to flip the thing over for access... welds are ugly but will probably work.... for as long as i care to ride this thing. if i'm taking the front end off i'm not putting the original back on, nope. time to resume the swap upgrade of my dreams. it's been at least 7 years since starting this. it's time to finish.

so, i printed the lastest version of the hub to rotor spacer (white plastic) to verify fittment and as before, it's fine.
attachment.php

attachment.php

attachment.php


it would be a lot easier to adapt the native cbr900rr rotors to the gl1000 hub because then the original calipers 900rr would bolt on the forks no problem but.... they'd hit the spokes. also they're not spiffy enough being slightly smaller diameter. bigger is better afterall, that's why i want to ride a porky 70s goldwing?

original 900rr caliper, so close yet so far:
attachment.php

likely candidate Nissen 6 piston caliper from a MV F4 because why not?
attachment.php


annoyingly the nissen 6 piston uses i think an M8 fastener where the original 900rr uses M6, so i won't be able to use 1 of the existing mounting holes like this. drilling out the fork bracket hole wouldn't leave enough wall thickness for rules of thumb engineering, and i'll be dipped in shit if i'm going to do the calculations myself. this ain't that kind of build.
attachment.php


next up, finalize the spacers. i got them a little skewed to one side, no biggie they're PVC for the moment.
also get the rotor adapters carved out of some metal for realzies
also also work on the adapter brackets for the calipers, or maybe find some of the 6 piston tokicos that are a direct swap for the original 4 piston nissens that might let me use one of the original bolt locations. decisions decisions
 

Attachments

  • Compress_20230308_081502_2159.jpg
    Compress_20230308_081502_2159.jpg
    119.8 KB · Views: 104
  • Compress_20230308_081502_2843.jpg
    Compress_20230308_081502_2843.jpg
    97.6 KB · Views: 104
  • Compress_20230308_081502_2725.jpg
    Compress_20230308_081502_2725.jpg
    77.8 KB · Views: 104
  • Compress_20230308_081502_2600.jpg
    Compress_20230308_081502_2600.jpg
    136.6 KB · Views: 104
  • Compress_20230308_081502_2463.jpg
    Compress_20230308_081502_2463.jpg
    129.9 KB · Views: 104
  • Compress_20230308_081502_2322.jpg
    Compress_20230308_081502_2322.jpg
    127.8 KB · Views: 105
Last edited:
Spacers made!
Did I machine them accurately?
Did I do the math properly, before machining them?
Will they fit?

No clue, I should have a few minutes to check sometime this year
 

Attachments

  • Resize_20230320_105345_5966.jpg
    Resize_20230320_105345_5966.jpg
    64.8 KB · Views: 1
It's like they say, measure 5 times, cut 10?
Spacers are wrong but I have more material and I measured again so that's good.

Caliper brackets needed a tweak, good thing I have a 3d printer eh?

At least the modified triple trees and bearings went perfectly? Right?

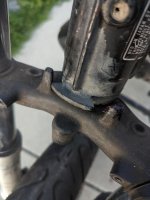
Nope. Stem is a bit shorter than I want it. I'm pondering throwing money at it and buying a later model 900rr lower triple and adding a cognito moto adapter stem which offends my cheapskate nature, bit saves a lot of time and futzing. Time is the only thing I can't buy more of so... Maybe buying is actually cheaper?

Anyway, triples fit well enough to put the front end on and I do like the look so far. Steering stop needs a little work tho :laughing
 

Attachments

  • Resize_20230327_104024_4756.jpg
    Resize_20230327_104024_4756.jpg
    61.6 KB · Views: 4
  • Resize_20230327_104025_5046.jpg
    Resize_20230327_104025_5046.jpg
    52.7 KB · Views: 2
A little closer

attachment.php


attachment.php


The spacers need some fiddling to get it all centered, the rim isn't centered over the hub and centering the hub between the legs has been my goal, so some adjustment is needed. One caliper is much closer to the spokes than the other so I'd like to even that out a bit as well. Baby steps I guess.

Feel free to comment about how precise the spacers need to be before binding is a problem over in the garage
 
Last edited:
As a former owner of a 79 Wing, I approve.

Mad
 
Possibly a dumb answer, but, since this is a spoked wheel wouldn't the move be to adjust the dish of the wheel to center the rim over the hub?
 
As a former owner of a 79 Wing, I approve.

Mad

they're really fun to ride, even stock!

Possibly a dumb answer, but, since this is a spoked wheel wouldn't the move be to adjust the dish of the wheel to center the rim over the hub?

you could do that, but for one i don't know how and i don't know if there is that much latitude available. more importantly, i would also like to have the option to use the lester mag wheel that was available for the 75-77 gl1000, which would use the same spacing including relative position of the hub and rim. if i dish the spoked rim the spacing would be all wrong for the lester when i find one.

there's also a chance i'll put a mechanical speedometer drive on the thing, and part of the spacer weirdness is making room for the speedo drive on the right side. or maybe it's the left.... the brake disk is probably in the way of the cable but i'll burn that bridge if i get to it.
 
Last edited:
Well. This complicates things

no it doesn't. given the lack of confidence in the gl1000 i bandaided i have been looking for a better engine to swap while i slowly get the front end swap sorted out.

as usually happens, a "parts bike" came along in better shape in every way than the bike i'm working on AND it has some cool upgrades i've wanted to find for my bike anyway

weber 40IDF down draft carbs already installed and sorted (plugs indicate it is running really rich, but better that than lean eh?)
C5 electronic optic trigger ignition (only available for a few years. company still exists though)

whole bike has been cleaned in general. however it has a clutch problem which should be straight forward once i have time to get in there. the ignition is also not sparking, and the manufacturer still answers tech questions so i have some ideas there...

so new plan: get this 1981 gl1100 running and safe probably forget about the 1976 for a very long time. eventually, make cbr900rr forks work on this gl1100 frame but not sure which wheel to use. the "backwards" comstars are well and truly hideous on their own but ther aren't many options for this bike. the 1983 gl1100 cast 7 spoke wheels look pretty good and are a straight swap if i stumble on a set someday. wire front from the 76 would be cool, but difficult to match with anything on the rear as it was never an option for the 1100 bikes.
 

Attachments

  • Resize_20230501_093654_4036.jpg
    Resize_20230501_093654_4036.jpg
    67.4 KB · Views: 9
Last edited:
Back
Top