• There has been a recent cluster of spammers accessing BARFer accounts and posting spam. To safeguard your account, please consider changing your password. It would be even better to take the additional step of enabling 2 Factor Authentication (2FA) on your BARF account. Read more here.

RD250: Going with the flow...

After what seems like an age, I've started back on this again. First up was to work up the left hand pipe. I started up with the same 120ish bend on the header section, but it was immediately apparent that the rest would need to be substantially different from the RH pipe to clear the sidestand lug. Logically, it would make more sense to cut and reweld the lug somewhere else, but not wanting to cut the frame any further, I thought I'd go around...

This necessitated a lot more cutting of cone sections, which with an improved system of clamping went better than the last time.
 

Attachments

  • A242CBFF-120A-4C52-BA39-58000A80EF4D.jpeg
    A242CBFF-120A-4C52-BA39-58000A80EF4D.jpeg
    135.4 KB · Views: 1
  • 03C56895-7E8C-4411-B090-B149CE6F5527.jpeg
    03C56895-7E8C-4411-B090-B149CE6F5527.jpeg
    128.6 KB · Views: 1
After a lot of clocking of the various sections, I welded up the main cones for a final look. Again, fit on anything that I'd cut went generally smoothly, the tricky part is the fit between the cones formed separately. Despite using the slip roller, I struggled to get the cones uniformly round. Next time, I will try making smaller segments with the entry and exit angles accounted for on the template.

That said, it's quicker to weld one long seam, than 8 short ones, so it's not necessarily a time saver to do it that way, I just think I'll get a neater result. Aside from a few inches in the belly, most of this one went together without filler, so a better result than the first.
 

Attachments

  • 6ABF8113-BCFE-45EF-94AB-EFC073E42457.jpeg
    6ABF8113-BCFE-45EF-94AB-EFC073E42457.jpeg
    113 KB · Views: 3
  • 399A1B81-23C3-40D4-A89F-657D0FFFE2F1.jpeg
    399A1B81-23C3-40D4-A89F-657D0FFFE2F1.jpeg
    124.7 KB · Views: 4
  • F757B956-2BF3-4471-94AC-A7580B2A96E5.jpeg
    F757B956-2BF3-4471-94AC-A7580B2A96E5.jpeg
    98.2 KB · Views: 4
Last edited:
All in, I'm not unhappy with how they fit. You can see in the last picture how different they are to avoid the sidestand boss. The good thing is they're entirely tucked under the bike so ground clearance is hugely improved. Just got to finish up the end caps and cores for the cans and I'll have them on the bike to test. I also need to decide whether to bury the exposed stinger section in the baffle cone. I think it will look better and apparently they are significantly quieter that way. Performance is theoretically unaffected if I've read correctly. (Somewhat of a question mark on that!) as it's definitely not the fashion these days on other pipes I've looked at.

After that, the engine is coming out for a refresh and maybe some adventures in porting / squish reprofiling....
 
Last edited:
In honor of this being the first moto forum post I can remember that contains the word "soupcon", I am subscribed.
 
Almost there....this time, Acetylene bottle finally stopped play, I'll have to go and swap it tomorrow. I shall miss my old bottle - it came free and almost full with a little torch I bought and was last filled in 1983! The drive back from San Pedro to LA was straight out of 'The Wages of Fear.' After squirting it religiously with fairy liquid every 5 minutes for a while, I decided it wasn't going to explode and we've lived happily together since.

I roughed up an end cap for the RH pipe and mounted it up again to check on the angles. I'm definitely going to sink the stinger into the baffle cone. The only remaining question is whether to have a tip out the back (like in the photo,) or have the exit flush. I'm erring towards a tip....what say ye?
 

Attachments

  • 18A65097-4162-41D7-9C52-D06AB93D31B4.jpeg
    18A65097-4162-41D7-9C52-D06AB93D31B4.jpeg
    127.1 KB · Views: 4
  • pipe2.jpeg
    pipe2.jpeg
    122.7 KB · Views: 10
Last edited:
Tip vote here!!
 
That's a ton of effort put in to those pipes. Looking good.

I vote for the tip.

NNqiY0u.jpg
 
I also vote for tips on the silencers (rolled ends optional). +1 for the TZ Mike end cans if you want something ready to bolt on.

20230428_095137 by andbike, on Flickr
 
Julian and Ken agreeing with tips makes me feel justified. :laughing :thumbup
 
Tips it is!

I do like rolled ends but don't have a roller to do them and am impoverished after swapping out my Acetylene Cylinder. Oy, the gas is getting pricey! I'll try and get them finished this weekend. After which, a small hiatus while I resolve a title issue before commencing further wallet abuse on engine and suspension parts.

I have some fancy carbide burrs arriving anytime that I'm keen to play with. The general plan is to address the squish (provided I can borrow my friend's lathe) and very mildly tweak the porting towards R8 / 250 LC territory, with a clean up of the transfers. Nothing radical...

....to add, I love those TZMike short end cans. They are definitely going on a future project.
 
Last edited:
Et finalement...Pipes are buttoned up and done. Note to self, when setting the stinger angle, make sure all the brackets are fixed firmly to the engine and frame. I lock-wired, zip-tied and ended up with exit angles that are not exactly where I wanted. Until yesterday evening, I had malevolent thoughts of hacksaws but on reflection, I think I'll leave them slightly wonky. There is plenty I would improve next time, so I'd rather crack on with other stuff for now.

Alloy cans would be a useful weight saving. I was surprised how heavy mine are, once I'd made the baffles and packed them. Still a fraction of the weight of stock but the proverbial tank compared to the A kit pipe on my RS125. I'd say 20 ga is the MAX thickness you'd want to make road bike chambers in. I'm going to use 22 ga next time - not quite 20% lighter. It's much easier to work and a little harder to weld.

I used 3/32 ER70S2 rod for the spring clips. Hopefully it won't crack.

Typically, when I went to start it, the battery was completely flat and so dead it wouldn't even take a charge. So the aural experience will have to wait. Doh.

Oh, what's the vote on Paint vs Raw? I was thinking of brushing them with sesame oil for seasoning and leaving them au naturel but a classic black might look good too.
 

Attachments

  • 209A8C0B-086A-4394-A2D2-188A09A15B29.jpeg
    209A8C0B-086A-4394-A2D2-188A09A15B29.jpeg
    134.4 KB · Views: 15
  • B8563B51-B702-42E1-87F7-71AC11C5A2C4.jpeg
    B8563B51-B702-42E1-87F7-71AC11C5A2C4.jpeg
    140.5 KB · Views: 18
  • 18BB1EB8-BD4E-4258-8070-72DC614432E0.jpeg
    18BB1EB8-BD4E-4258-8070-72DC614432E0.jpeg
    121.2 KB · Views: 16
  • FEFF72CB-9C54-4D94-9BA3-0E71B0B33979.jpg
    FEFF72CB-9C54-4D94-9BA3-0E71B0B33979.jpg
    66.3 KB · Views: 15
Last edited:
If you like the 'natural' finish, spray them liberally with WD40 before and after each ride. Yes, some will burn off and smoke a bit, but eventually they will turn a cool natural shade of tan and keep the rust away. Otherwise, black is cool too!
 
Wow just found this thread. Fun project! Thanks for posting! :Popcorn
 
A bit of aural gratification....All seemed OK! I conducted a highly scientific test in the alley and it appears we have a considerable uptick in excitement. It now wheelies in first, as all two stroke twins should...

The engine is now out and waiting for parts. Two immediate observations, the squish is MILES out and there is a scale model of the Hoover Dam in the bottom of the exhaust port. Neither will do, so I dropped the cylinders at the weldors to fill in the chasm before I start on the porting. I'll take the heads and barrels around to my mates once I have the bottom end back together. I'll take a bit off the heads and the lip off the top of the barrels so I can set the squish with different thickness gaskets. I am using luddite computer skills to try and make a cad file to take up to IMS, where they will laser cut copper gaskets to your spec. I would ideally, like to recut the actual squish band and chamber, but don't really have enough time to experiment at the moment. Next time...


Good news, is that the crank felt great and the barrels were still on stock bores, with very little scoring. Probably could have got away with 1st over, but I went with a pair of 250LC pistons in 0.5mm over to be safe. Waiting for them to arrive so I can measure them before going to the machine shop for the rebore.

https://www.youtube.com/shorts/QXHC_a4VUBk
 

Attachments

  • B5D42A4E-7272-4897-9671-10EC1EB704AD.jpeg
    B5D42A4E-7272-4897-9671-10EC1EB704AD.jpeg
    67.7 KB · Views: 2
  • F8343415-2D9D-47F5-A72B-FC51321C76A6.jpeg
    F8343415-2D9D-47F5-A72B-FC51321C76A6.jpeg
    145.7 KB · Views: 3
  • 449B4270-0CF8-4BD1-AB12-E500EAEE8381.jpeg
    449B4270-0CF8-4BD1-AB12-E500EAEE8381.jpeg
    84.8 KB · Views: 3
Last edited:
Damn, I'm really not having a lot of luck with having stuff done at the moment. I had to go to a different weldor for the cylinder stuff and despite assuring me he knew what he was doing, he got too close to the liners and has melted the edge a bit! I only noticed when I got home. I'm going to have to drop the floor of the exhaust port about 1mm to clean things up. I think this should make very little if any difference to performance. Hopefully the bores should still be fine at 0.5mm over.

SHITE!
 
I dropped the barrels at the machine shop yesterday and they think they'll bore out OK. Fingers crossed. By the by, for anyone needing RD / RDLC / RZ pistons, I ordered from a place called IMD in the UK. A pair of pistons, inc rings and pin arrived in 3 days for USD132 all in. They're good looking, Japanese cast items, seemed like very good value.

Looks like I'll be waiting over a week for the Bore, which is cutting things a bit fine as I still have to measure the squish, mounted head vol and cut gaskets to fit. I have some 0.021" and 0.027" copper sheet ready (given up on the CAD :)). I reckon 0.027 will be safe, 21 might give a bit extra squeeze but possibly tip me into detonation. According to a very useful german website, (https://www.rd250tuned.de/english-and-other-languages/) he experienced detonation at 0.9mm of squish and had to take 1cc out of the dome, with stock ports. I've raised the exhaust port by about 0.5mm, which should accomplish the same.

I think today should be delivery day, so I've got a plethora of other tweaks to keep me busy in the meanwhile.

- Strip the bottom end and fit new oil seals.
- Strip the forks, and fit the emulators and new springs and seals.
- Fit the new brake master cylinder and single line, getting rid of the hard line.
- Tinker with the electrics, for the electronic ignition install. I got the HPI system with the small rotor and 60w Lighting coil.
- Cobble together some headlight mounts, mudgaurds and a rear light!
- Make a new side stand, or lean it against a tree every time I need to take a leak.

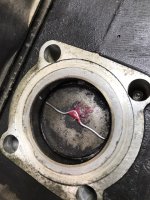
Oh as far as the porting went....I'm not entirely finished yet but the main details were:

Exhaust port raised by 0.5mm from 29.5 to 29mm.
Exhaust port widened by 4mm from 31 to 35mm
Improved inlet with hopefully functioning boost port.
Opened out the base of the transfer ports and cut the liners back to uncover a bit more of the main transfer.

All was done based on the portmaps, kindly provided on Ed Ehrlenbach's site. The end result, should be something a bit closer to RD250LC porting but nothing too radical. The exhaust port is <65% of bore diameter, which should give an OK cushion I hope.

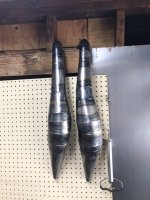
These are the first cylinders I've ported, so a degree of trepidation is expected. It went OK, with the help of a 40 buck Harbor Freight flex shaft tool, and some EXPENSIVE burrs. Made a mess of the dining table though, which did not endear me to the boss...
 
Last edited:
Bit more progress to report, although like all my favorite roads, it wasn't exactly linear. Friday saw a multiplicity of deliveries, amongst them, the oil seal kit I needed to rebuild the bottom end. Full of enthusiasm, I set at it Saturday morning and lo, it was not easy. Unmoved in 50 years, and seemingly loctited from the factory, the clutch cover screws were an absolute beast to get out. Judicious application of a hammer and impact eventually got them free. By the by, I bought a set of Vessel JIS Impact screwdrivers a few years back and they've been mega. Saves reaching for the big impact.

Anyways, all was going swimmingly until I clocked that the kit had included two 22 x 7mm shaft seals for the shifter fork shafts, where you need 22 x 7 PLUGS! Bugger. So I gave everything a good inspection and left it. I've ordered new clutch plates and springs as they were a bit marginal. Hopefully the plugs arrive this week and I can cobble it back together.

With no further progress possible on the engine, I decided to get busy on the rolling chassis. I wanted to do some minor upgrades to the forks, as stock, they are woefully limp noodles. Considering the smoldering remains of my wallet, I ordered a pair of knock-off gold valves from MikesXS that they sell for XS650s. Various internet commentators suggested that these could be made to fit the 34mm RD forks and at $65 bucks, they seemed a deal. To assuage my guilt, I ordered a set of straight rate springs direct from Racetech.

Turns out the fitting was even more of a doddle than the internet suggested. The valves sat perfectly on top of the damper rods and the jam nut on the bottom did not interfere with the roll pin through the damper shaft, as the internet suggested. Possibly you could screw it in enough that it would be an issue, but not in the range of adjustment suggested. So basically, it's drill four holes in the bottom, chamfer and throw the whole to back together.

I thought 10w might be a bit heavy, and 5w too light, so made up a little maxima cocktail of the two. About 6fl oz in each leg. I couldn't do much about setting preload until the engine is back in, but I have to say, they feel better. Much more like conventional, modern forks. I'll reserve judgement until I have a go but for less than $200 bucks, inc oil and seals, it seems a very good mod. I swapped the fork legs around to sit the caliper behind the leg too. Just because.

Oh and in a win for old Japanese bearings and bushes, I checked the swingarm, headset and both wheels and aside from dry grease, they were butter smooth. Freshly packed and hopefully ready for another 50 years.

I'll either have a look at the electrics next, or maybe start making a rear mudguard. I don't have the stock one and can't find anything cheap and cheerful I like online. I've got some 1/16" 3003 Aluminum sheet, I could probably use for something basic.
 

Attachments

  • 38E953BA-3614-45D5-92F9-64716CE9B8A6.jpeg
    38E953BA-3614-45D5-92F9-64716CE9B8A6.jpeg
    108.5 KB · Views: 3
  • 12899C64-894E-4FE0-99B5-0B28EEF32DC3.jpg
    12899C64-894E-4FE0-99B5-0B28EEF32DC3.jpg
    44.8 KB · Views: 2
  • CD94DD47-D813-4532-BAE8-EE3C97083A33.jpeg
    CD94DD47-D813-4532-BAE8-EE3C97083A33.jpeg
    115.9 KB · Views: 2
  • BB19AB54-9E08-4CD8-8D0D-2745B18AA59A.jpeg
    BB19AB54-9E08-4CD8-8D0D-2745B18AA59A.jpeg
    115.4 KB · Views: 2
Back
Top