Session 25: Main jet removal
I haven't visited the bat cave on my way home from work all winter because I am usually too tired. Tonight, however, I decided to grab the carbs and bring them to the comfort of home sweet home. But before I did that I sprayed down the carbs with carb cleaner and used a brush to scrub off much of the macro varnish green slime found all over. Ahh much better

After dinner with family, it was playtime. I commandeered the dining room table and repurposed cookie sheet lined with parchment paper as a clean work surface

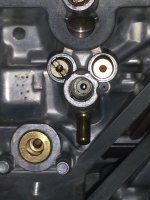
Tonight's goal was the main jets. The RVF's carb assembly is comprised of four aluminum diecast bodies with various brass bits screwed/pressfit into them. Some of the parts can be removed for cleaning/replacement, many don't seem to come out. All are small, precise and delicate looking.
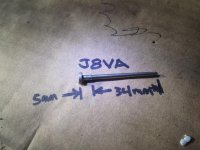
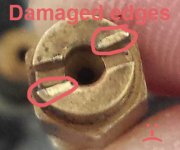
The main jets have a slotted recess running across their width. I grabbed a flat tip screw driver that seemed to fit decently and tried to turn things. Left loosey, righty tighty. None were turned. I learned that carburetor brass is almost dead soft (doesn't seem hardened at all!) and deformed very easily. I managed damage the screw slot of each jet.

Here we go again! Nothing was budging and all I got was uglier main jets. I was upset for making things less pristine. I made one last go at it by using more force and got only the driver fo cam out and spread the jet's slot wider. Crap! More cosmetic surgery to add to my growing list of things to fix.
Looking thru my driver and driver bit collection I found not all screwdriver tips are shaped the same. Some have tapered sides, some flat then curved, others mostly flat and parallel, etc. The perfectly flat and parallel is what I should have used. A bit with tapered walls contacts on too small of an area. The ideal driver would fill the slot leaving no gaps. It turns out the bit set that came with my Kirkland socket kit had the perfect shape and thickness. Quality stuff this. Made in Taiwan no less
. Take a look at the photos and you'll see what I mean. The bit on the left make even surface contact over a large area.
I loaded the bit into the driver handle and precisely placed the flat tip into the slot. No love. I dared not try any more for fear of splitting the brass. but at least this time I didn't deform the jets any further. What to do?
Looking more closely I saw that the jet screwed into another brass part. Turns out it is called the jet holder or emulsion tube. This part has a hexagonal body which looked easier to crank on. Sure enough, way easier. A 7mm socket, crack! and all 4 main jet assemblies were out. They are presently soaking in a jar of acetone in the hopes that any varnish will melt away and make it possible to remove jet from holder. We'll see.
Looking into the tapped hole where the tubes were installed I see more green caca. Per Bill and Steve's recommendations, I'll be sure to be fastidious and clean everything the best that I can.
One thing for sure, working at home is way more comfy: heat, light, food and bathroom. Think Jessica would let me bring baby into the house?