• There has been a recent cluster of spammers accessing BARFer accounts and posting spam. To safeguard your account, please consider changing your password. It would be even better to take the additional step of enabling 2 Factor Authentication (2FA) on your BARF account. Read more here.

Reanimating a greybike RVF400 (NC35)

Rabbit holes and parts Jacuzzi's I love it.
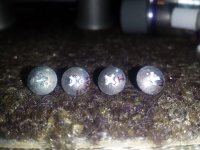
 
Session 32: Dismantled carbs cleaned.

The cleaned carburetor bodies came out well as far as I can tell. I've been focusing on cleaning everything else the best that I can in preparation for reassembly.
 

Attachments

  • NC35 carb parts1 overview.jpg
    NC35 carb parts1 overview.jpg
    175.2 KB · Views: 76
  • NC35 carb parts2 airbox plate and funnels.jpg
    NC35 carb parts2 airbox plate and funnels.jpg
    136.7 KB · Views: 43
  • NC35 carb parts3 fuel bowl.jpg
    NC35 carb parts3 fuel bowl.jpg
    146.8 KB · Views: 59
  • NC35 carb parts4 bodies.jpg
    NC35 carb parts4 bodies.jpg
    141 KB · Views: 69
  • NC35 carb parts5 choke and hoses.jpg
    NC35 carb parts5 choke and hoses.jpg
    185.6 KB · Views: 46
  • NC35 carb parts9 choke valve caps.jpg
    NC35 carb parts9 choke valve caps.jpg
    207.9 KB · Views: 52
  • NC35 carb parts8 choke linkage.jpg
    NC35 carb parts8 choke linkage.jpg
    188.8 KB · Views: 55
  • NC35 carb parts7 another hose.jpg
    NC35 carb parts7 another hose.jpg
    179.1 KB · Views: 49
  • NC35 carb parts6 needle diaphragms.jpg
    NC35 carb parts6 needle diaphragms.jpg
    195.6 KB · Views: 80
Brass cleans up nicely with polish and some elbow grease.

A few zinc plated parts show a bit of corrosion. I tried to clean them using various metal polishes without success. I think the corrosion (zinc oxide?) is too thick and can only be removed with an acid bath. I've read about people sending their zinc plated fasteners out for replating but since they seem serviceable I'll just use them as is.
 

Attachments

  • NC35 carb parts 3 jets.jpg
    NC35 carb parts 3 jets.jpg
    166.5 KB · Views: 42
  • NC35 carb parts 2 choke valves.jpg
    NC35 carb parts 2 choke valves.jpg
    110.6 KB · Views: 52
  • NC35 carb parts 1 float pivots and valves.jpg
    NC35 carb parts 1 float pivots and valves.jpg
    207.7 KB · Views: 43
  • Choke valve before after.jpg
    Choke valve before after.jpg
    64.3 KB · Views: 42
  • Choke linkage screws.jpg
    Choke linkage screws.jpg
    81.2 KB · Views: 33
  • NC35 carb parts 4 mixture screws.jpg
    NC35 carb parts 4 mixture screws.jpg
    192 KB · Views: 49
  • NC35 carb parts 5 float.jpg
    NC35 carb parts 5 float.jpg
    57.2 KB · Views: 38
Session 33: Litetek carb kit

Litetek (Thailand) carb kit at a glance. Comes with all seals and O-rings for a carb rebuild Viton rubber purportedly more ethanol resistant and buna-nitrile rubber. Wish they sold float valves :(

I will coat the rubber parts with silicone vacuum grease before installing. I figure the grease will help temporarily hold them in place when putting the parts together and help seal.
 

Attachments

  • LiteTek needle holder O-ring.jpg
    LiteTek needle holder O-ring.jpg
    105.7 KB · Views: 45
  • LiteTek mixture screw kit.jpg
    LiteTek mixture screw kit.jpg
    87.6 KB · Views: 46
  • LiteTek Fuel Tee O-Ring.jpg
    LiteTek Fuel Tee O-Ring.jpg
    87.5 KB · Views: 55
  • LiteTek float bowl seal.jpg
    LiteTek float bowl seal.jpg
    122.2 KB · Views: 46
  • Litetek drainscrew o-ring.jpg
    Litetek drainscrew o-ring.jpg
    90.8 KB · Views: 62
  • LiteTek Overflow O-Ring.jpg
    LiteTek Overflow O-Ring.jpg
    89.7 KB · Views: 43
  • LiteTek Vacuum Breather O-Ring.jpg
    LiteTek Vacuum Breather O-Ring.jpg
    92.5 KB · Views: 34
  • Litetek airbox seal.jpg
    Litetek airbox seal.jpg
    82 KB · Views: 47
Last edited:
Hey Rick. Thanks for documenting all of this and the great photos of all of the parts. I'll never deal with a bike like this, but what you've done here should be valuable to anybody else who does. :thumbup
 
Hey Rick. Thanks for documenting all of this and the great photos of all of the parts. I'll never deal with a bike like this, but what you've done here should be valuable to anybody else who does. :thumbup
Thanks Scott. Lots of info online for the sister bike VFR400 NC30 but not so much for the RVF400.

BTW never say never :teeth

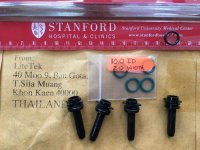
You can get them on eBay from a local (US-based) seller. Search for 16011KCK910 on eBay. Or K&L 18-8953.

Hey Krooklyn, thanks! I should have been more clear, I meant to say it's too bad Litetek doesn't offer them in Viton. Everything else is but the one item :(
I'll ask Litetek if it's on their product road map.

FWIW I think mine are fine. For a visual check I looked at them under magnification and they look smooth and supple. I know, I know, I'm a cheap SOB. :x EDIT: $30, okay maybe I can splurge :rofl. I'll do a vacuum test for assurance.

BTW when balancing carbs, many opinions on teh BARF, manometer, dial gauges, DIY yardstick, bench sync good enough, digital, etc. So many options but I don't plan to do this a whole lot if ever again. I am leaning toward DIY. I mean it's simple physics, balance the vacuum across all carbs. How hard can that be!?! :dunno

Further, to tweak the mixture screw is the fancy 90 degree screw driver recommended? Any ideas for DIY version?
 
Last edited:
FWIW I think mine [float valves] are fine. For a visual check I looked at them under magnification and they look smooth and supple.

..... but I don't plan to do this a whole lot if ever again.

Hey Rick, not to be argumentative, but to me these two statements are contradictory. How would you feel if your original float valves started leaking in a few years when you passed up the chance to replace them now? FWIW the cb-1 float valves I got from nrp-carbs.com were great quality Japanese made and very reasonable.

On synchronizing, again I'd recommend an excellent article by Mike Nixon here. He points out that bench syncing can give great results but does not take into account variations in engine tune, valve clearance, compression etc. that can affect manifold vacuum. In a healthy engine those are usually minor though.

Also, someone recommended using a pair of 1/8" drill bits as gauges under the throttle blades for bench syncing. I would argue that props the throttles open way too far. Syncing only benefits idle and off idle so the plates should be very nearly closed for bench syncing, think narrow feeler gauges. Secondly, on many bikes the sync changes between idle and slightly above idle for whatever reason, probably slop in linkages. So again, for best idle, bench sync with throttles as close to idle position as possible. My $0.02

-Bill
 
Last edited:
The size of the drill bit doesn't matter.......it is a static setting. As long as the same size is used....then the gap...the size of the drill bit will be the same on all, even with the drill bit removed.

With a multi cylinder engine that is individually carbureted, sync does matter in idle and smooth acceleration and deceleration.

Take your cb1.......adjust one sync screw slightly and then tell me the idle doesn't change.
 
The size of the drill bit doesn't matter.......it is a static setting. As long as the same size is used....then the gap...the size of the drill bit will be the same on all, even with the drill bit removed.

Yes it is a static setting, but with the throttles open way beyond where they would be at idle. And as I stated, on many, possibly most bikes, after syncing with vacuum gauges at idle and then opening the throttle slightly, the gauges will read differently. It's no more trouble to bench sync with the throttles as close to the idle position as possible, which is where syncing is most important.

With a multi cylinder engine that is individually carbureted, sync does matter in idle and smooth acceleration and deceleration.
Take your cb1.......adjust one sync screw slightly and then tell me the idle doesn't change.

Sorry, possibly you misread my post above. Yes misadjusting one carb will most definitely change the idle. My whole point was that syncing is most critical at idle. It also affects just off idle, but its effect diminishes quickly as the throttles open further and a few thousandths difference in throttle position becomes insignificant compared to say, a 1/8" or higher opening.

-Bill
 
Further, to tweak the mixture screw is the fancy 90 degree screw driver recommended? Any ideas for DIY version?

I was too cheap to buy those screwdrivers and I seriously doubt you'd be able to easily (read use at all) use those screwdrivers on the RVF. Just set it to 1 5/8 from in (stock) and call it a day. If you have to adjust it just take the carbs back off and do it that way. I've gotten so quick at that task that it's not worth the struggle of finding out some fancy specialized tool doesn't work. :nchantr
 
Last edited:
Google searched the PN Krooklyn posted. Shopping results showed the float valve for only $3. Seriously?!? Keihin replicas with Viton too good to be true? In South San Francisco no less. I bought a few other items while I was at it. Pick them up tomorrow. Anyone ever deal with them? http://4into1.com

EDIT: I placed an order Friday evening and picked up the loot (float valves, crush washer, hose puller-offer wrench, vinyl pouch, fuel filter for C70 Passport the next day on a Saturday. 4-into-1 are located just north of the SFO airport in an industrial area. They don't have a retail store just now but I believe they plan or resurrecting it. It looked like a clean well organized warehouse. Friendly guy went to grab my order and gave me my parts and tools. They focus more on vintage stuff. The float valve packaging has label that says CB550 a Honda bike manufactured from 74-78.
 

Attachments

  • 4-Into-1 buy.jpg
    4-Into-1 buy.jpg
    195.5 KB · Views: 26
Last edited:
Baby Hondas off to uncle's

My buddy Anthony was itching for a project. Wants to take over RVF but what's the fun in that? I had a more interesting one for him. Been sitting in my garden shed for over 20 years :shame
Anthony graciously agreed to attempt to get two running :thumbup wishing him luck.
 

Attachments

  • IMG956094.jpg
    IMG956094.jpg
    74.1 KB · Views: 31
What else do you have hidden in that shed.
Trail 70?
:teeth
 
What else do you have hidden in that shed.
Trail 70?
:teeth

How about "Trail Making" stuff? :laughing The rest was boring gardening stuff, an ancient electric kiln, furniture, snorkeling gear, and two Whammo Slip 'n Slides. :thumbup
 
Last edited:
Session 34: Valves pt. 2

My valve adjustment journey continues. Several weeks ago I attempted my first valve inspection where I found 15 of 16 valves within spec. (although not consistent in values). The one that was out out of spec was corrected by swapping two shims. I thought I was done.

There were suggestions from folks to set the valves to the same values and bias toward the upper end of the spec to accommodate any wear while running the engine. I was on the fence to accept within spec was good enough vs. making all valves gaps the same. The nag to make them all the same won.

During the last few weeks I read online that the Haynes manual picture wasn't accurate as it showed measuring the gap between CAM and rocker which was wrong and what I had followed. The correct gap to measure is between shim and rocker. I figured what difference would it make as they should be the same, right? Not so, I learned.

Last night I spent 3 hours doing another valve inspection this time measuring between shim and rocker. I got different results and the findings were worse as several valves were "way" out of spec and mostly too large of a gap :(

I find this odd as valves are supposed to wear slowly toward a smaller gap during engine use (my engine has never run BTW). And why were the valves basically in range when I measured the wrong gap and now out of spec when I measure correctly!?! Did the previous mechanic set the valves by measuring the wrong gap, too?

I read that out of spec valves can damage an engine and I hope my engine is fine. Too large of a gap (my situation) means the valves won't open long enough and the end of the valves get "hammered". Too small of a gap and the valves stay open to long and burnt valves may result (not my situation luckily).

What to do at this point - trust I did the inspection correctly this time and go about re-shimming the valves and move on or open the engine and inspect valves and cylinder?
View attachment 506388
 

Attachments

  • Screen Shot 2018-03-25 at 11.20.05 AM.jpg
    Screen Shot 2018-03-25 at 11.20.05 AM.jpg
    96 KB · Views: 66
Last edited:
Just trust that you're measuring them the correct way now and re-shim them as needed. No need to do a complete engine disassembly when you've not even fired up the bike.
 
Just trust that you're measuring them the correct way now and re-shim them as needed. No need to do a complete engine disassembly when you've not even fired up the bike.
Right. Will re-shim and move on. Thx.
 
House call tire changer

Installed 4 new tires last night. Not for the RVF but my '81 and '82 C70s my buddy Anthony in San Francisco is reviving. The tires were badly cracked and he wasn't up for changing tires. He was going to have his local shop do the work for the princely sum of $34/wheel. I, being cheap & having changed many bike tires and flats in my day, was determined to ride up after work and DIY.

After work, I rode my 29 year old 399cc CB-1 up to SF during rush hour traffic. Open areas I'd move out of the commuter lane as it felt abusive to hold 9.5k RPM at 85mph for long stretches. The CB-1 is not happiest on the freeway.

MV to SF was the longest ride I've been on in 19 years and the most lane splitting I have ever done. How folks suffer miles of bumper-to-bumper traffic is beyond me. It seems to me drivers on 101 and 280 are polite and predictable at that time of day with many drivers making way. I kept my delta to 10-15mph when traffic got nasty.

Changing C70 tires was harder than I remember but having decent tire irons (3 for $30 @ CycleGear) helped a lot (Anthony busted his plastic bicycle ones :laughing
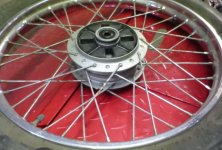
). We used a milk crate to prop up the bikes. Yes, the lucky SOB gets to work in his living room. Wheel 1 went perfectly. 2 and 3 wheels each had to be done twice due to pinched tubes. :mad Eventually after essentially 6 attempts the 4 wheels were shod with new Pirelli rubber. :thumbup. We're now waiting on new brakes shoes to arrive and some cleaning up and they should be good to go (we will see what DMV says).

The C70 has a clever means of coupling the drive train to the wheel - the rear hub has rubber cushions that spline to the sprocket that remains on the bike. The chain and chain guards can stay put though we did find a dead lizard in the guard we did remove. R.I.P. my reptilian friend.

Was it worth the $150 savings? I'd do it again. We had fun and got in some long awaited seat time.
 

Attachments

  • CB-1.jpg
    CB-1.jpg
    68.9 KB · Views: 40
  • My first bike.jpg
    My first bike.jpg
    84 KB · Views: 35
  • Anthony rear tire.jpg
    Anthony rear tire.jpg
    68.3 KB · Views: 30
  • 2018-03-29 20.56.46.jpg
    2018-03-29 20.56.46.jpg
    72.3 KB · Views: 25
  • 2018-03-29 19.50.13.jpg
    2018-03-29 19.50.13.jpg
    80.4 KB · Views: 36
  • Cush drive.jpg
    Cush drive.jpg
    70.8 KB · Views: 40
  • C70 lizard.jpg
    C70 lizard.jpg
    88.4 KB · Views: 37
Last edited:
Back
Top