• There has been a recent cluster of spammers accessing BARFer accounts and posting spam. To safeguard your account, please consider changing your password. It would be even better to take the additional step of enabling 2 Factor Authentication (2FA) on your BARF account. Read more here.

What have you made lately?

20 boxes is enough for ~60 birds! i have 2 boxes and 4 birds and it's not uncommon for them to only use 1. fukking weirdos.

water is the single biggest nuisance for me so far. haven't made it brainless to refill yet but i'll get there. they go thoguht a lot of water on a warm day

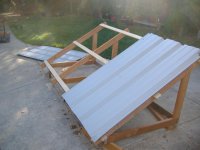
I read a lot online and it said each bird needs a box about 1 sq ft each so that is how I built although it is a little bigger than 1 sq ft each. Well, the wife will wnat to get more next year when they are selling them again so I may have room for growth.

It will actually house 13 chickens and 3 ducks. We caught some baby ducks from our pond flock and put one of the undersized chicks in with them figuring it would get more food that way and grow and now they are flock bonded not sure what will happen if we let the ducks loose in the pond right now.
 
~1sf is what mine are but they aren't all in there at once, like a flock of highschool girls going to the bathroom at the same time. they rotate. i think 1 per 3 birds is what i read, so i put 2 in for the eventuality we'd end up with 6 birds (max per city rules) eventually. nestin gboxes also don't HAVE to be in the coop. the birds sometimes lay eggs in weird places. ours all lay in the boxes luckily, no scavenger hunt around the yard for stray eggs. put a golf ball in the box to give them the idea of where to lay.
 
Last edited:
We finally redid my fireplace with California Gold Stacked Stone to cover the painted red bricks the previous owner did. Why would you paint red bricks red? :laughing

I didn't think to get a before photo, but the entire thing was red painted brink.

We are amateurs but I love it :love

SUCH a better look.
 
We finally redid my fireplace with California Gold Stacked Stone to cover the painted red bricks the previous owner did. Why would you paint red bricks red? :laughing

I didn't think to get a before photo, but the entire thing was red painted brink.

We are amateurs but I love it :love

Looks great. I did mine about 2 years ago. Cheap ugly floor tile framing the fireplace. Built a new mantle too. Such a difference for a weekend (or 2) of work and a few hundred bucks.

Sigh. Stupid sideways picture.
 

Attachments

  • AC4F9860-359F-4B9D-9245-87B848F91626.jpg
    AC4F9860-359F-4B9D-9245-87B848F91626.jpg
    28.2 KB · Views: 61
  • AAE18A78-2983-4DB4-9826-BA6654CDC8B4.jpg
    AAE18A78-2983-4DB4-9826-BA6654CDC8B4.jpg
    84.3 KB · Views: 83
~1sf is what mine are but they aren't all in there at once, like a flock of highschool girls going to the bathroom at the same time. they rotate. i think 1 per 3 birds is what i read, so i put 2 in for the eventuality we'd end up with 6 birds (max per city rules) eventually. nestin gboxes also don't HAVE to be in the coop. the birds sometimes lay eggs in weird places. ours all lay in the boxes luckily, no scavenger hunt around the yard for stray eggs. put a golf ball in the box to give them the idea of where to lay.

Will do. I didn't know about that or I could have made it easier on myself.

I like the coop though because we have a ton of chicken predators out here in the swamplands. Coons, skunks, possum, and just recently a family of foxes moved in about 200 yds away.

Also going to get some solar lights to keep the coop lit at night without having to run power out to it.
 
Several years ago my Daughter wanted chickens so we got one of those small coops at Costco (around $200). At first it was only going to be four chickens but that grew to eight! As soon as the chicks got big enough to move outside it was apparent the girls would need "MORE" space! I added the wire cage extension. Couple of problems, the coop only had one nesting box so the "Ladies in Waiting" would get all pissy and raise a ruckus until the got their turn in the box. So I built a second larger box but only 2 of them would used it. :dunno The other's would wait in line and get all skanky until it was their turn. :laughing

Another issue was it didn't have a floor and when it rained it got real sloppy. And you couldn't stand up in it. So, I made a roof for it and an access door on the end.
 

Attachments

  • Eggs n Golf ball.jpg
    Eggs n Golf ball.jpg
    71.9 KB · Views: 63
  • Coop Box.jpg
    Coop Box.jpg
    99.4 KB · Views: 66
  • Coop Ext..jpg
    Coop Ext..jpg
    132 KB · Views: 64
  • Small Coup Roof.jpg
    Small Coup Roof.jpg
    106.1 KB · Views: 60
  • Small Coup Roof2.jpg
    Small Coup Roof2.jpg
    73 KB · Views: 64
  • Small Coup Roof 3.jpg
    Small Coup Roof 3.jpg
    89.7 KB · Views: 62
A couple of other projects for my Daughter. :laughing

Plant stands for her patio. Made from tree trimmings and scrape redwood fence boards.
Couple of wine racks from old pallets. One became a book / magazine storage rack for the kids.
 

Attachments

  • plant stand.jpg
    plant stand.jpg
    134.5 KB · Views: 62
  • plant stand2.jpg
    plant stand2.jpg
    111.7 KB · Views: 55
  • pallet wine rack.jpg
    pallet wine rack.jpg
    70 KB · Views: 61
  • pallet wine rack2.jpg
    pallet wine rack2.jpg
    78.3 KB · Views: 58
Antwon412... here ya go. :thumbup
Taken with an iPhone? For sideways pic just open it in Preview (or other app) and then rotate it to the correct orientation you want and save it. Then upload to your BARF thread.

Some really cool projects in this thread !!! Keep 'em coming!
 

Attachments

  • Fireplace.jpg
    Fireplace.jpg
    15.7 KB · Views: 310
I made a strrawberry galette. The boat oven never seems to brown anything really well. :(

49888089511_ae298f140e_c.jpg
 
Yum! And big dollop of French vanilla ice cream.

What temp? 375, 400, or? Do you have an oven thermometer to check oven temp?
If your oven has a convection feature might try that for the last 5-7 minutes to help in browning.

Since you showed me yours, here's mine.
Pear and apple made for my Daughter and family. Gluten free crust.
 

Attachments

  • GF apple tart.jpg
    GF apple tart.jpg
    112.6 KB · Views: 72
  • GF Pear tart.jpg
    GF Pear tart.jpg
    107.1 KB · Views: 56
How was the crust what did you use? My apple pear gallettes come out perfect. I think what happends is we have inconsistant power on the boat so sometimes 350 degress is 350 and other times it isn't.
 
Have you tied an egg yoke wash on crust before baking?

I used Bob's Red Mill pie crust mix for these. It's primarily white rice flour. First time trying it. It's pretty good but not as easy to work with versus a "wheat flour", think crumbly even when chilled. Plus, no butter or crisco was added to help as a binder which also helps in a lighter, flaky crust.

I normally use an almond flour and add some Bob's GF baking flour, and/or other GF flour like coconut, rice, potato, tapioca, or oat. Have been experimenting with different ratios and flours, but have found the GF flours produce a denser crust. Even with an extra egg yoke or folded in egg whites. And all seem to require more water than you would add to a regular pie dough.

My Daughter has Celiac disease and other autoimmune issues and so has a GF diet and very limited dairy intake. Sucks big time! No more going out for a meal even if the place says "oh, yeah we can make that GF". Cross contamination is a huge issue. Unless it is a dedicate GF resturant/cafe/bakery she can't take the chance and there's very few of them around.
 
YES! Y'all are killing it big time. Love the creativity shown here.

Gonna share my new box I finished this weekend. It is not perfect but it is overkill for a shop jig box. This one is especially trivial for the nice walnut and maple I used, but utilitarian as it houses the jig I use for making all my benchtop dog holes. It's not perfect and got a few nicks already.

The magnets holding the box halves together are not quite strong enough but combined with the carbon fiber locating pins it's enough to sit on a shelf :) There are four 3/4" magnets that hold the drawer in and they are plenty strong.

This is not my design but my version of this for sure. The maple stripes were because I was using walnut from a previous project not quite wide enough... solved. I routed a slot in the back of drawer front to accommodate the rulers to fit since the pieces were just a tad short. Oh well, you adapt to materials you have. This was a salvage lumber job from a picture frame idea that went wrong so I think the result is great.
 

Attachments

  • 00_box_parts.JPG
    00_box_parts.JPG
    130.5 KB · Views: 119
  • 01_box_left.JPG
    01_box_left.JPG
    71 KB · Views: 107
  • 03_box_top.JPG
    03_box_top.JPG
    80.9 KB · Views: 104
  • 10_box_loaded.JPG
    10_box_loaded.JPG
    102.9 KB · Views: 114
Last edited:
A couple extra photos.
 

Attachments

  • 06_box_magnets.jpg
    06_box_magnets.jpg
    57.1 KB · Views: 108
  • 08_box_right_closeup.jpg
    08_box_right_closeup.jpg
    60.2 KB · Views: 101
  • 07_box_top_closeup.JPG
    07_box_top_closeup.JPG
    195.4 KB · Views: 102
Looks great. I did mine about 2 years ago. Cheap ugly floor tile framing the fireplace. Built a new mantle too. Such a difference for a weekend (or 2) of work and a few hundred bucks.

Sigh. Stupid sideways picture.

Nice, our home has hte same style (we did not do it, the previous owner got it done).
 
I made a bracket. The red button is my garage door opener, small switch is high/low for radar screamer.
 

Attachments

  • IMG_1729.jpg
    IMG_1729.jpg
    104.9 KB · Views: 116
  • IMG_1737.jpg
    IMG_1737.jpg
    95.5 KB · Views: 112
made some slabs of walnut

Hi all
Made some slabs of walnut from a tree on our property. I debated wether to turn this log into firewood but I'm glad I didn't. I had already milled up the butt end a while ago with a chainsaw mill, but waited on my bandmill to do this part
since it uses a smaller kerf.
I usually cut softwoods so it was fun to do walnut also more challenging in they aren't as consistent in shape as softwoods.
Tom
 

Attachments

  • IMG_0145.jpg
    IMG_0145.jpg
    145.7 KB · Views: 108
  • IMG_0146.jpg
    IMG_0146.jpg
    131.5 KB · Views: 104
Hi all
Made some slabs of walnut from a tree on our property. I debated wether to turn this log into firewood but I'm glad I didn't. I had already milled up the butt end a while ago with a chainsaw mill, but waited on my bandmill to do this part
since it uses a smaller kerf.
I usually cut softwoods so it was fun to do walnut also more challenging in they aren't as consistent in shape as softwoods.
Tom

i LOVE rough hewn walnut. if you are interested in selling all that board, let me know (pm).
 
Back
Top